

Codersera


8 min to read
Raspberry Pi 4: What Is It And How Can You Use It?
If you don’t know what Raspberry Pi 4 is, then you have landed in the right place. The Raspberry Pi is a series of small single-board computers developed in the United Kingdom by the Raspberry Pi Foundation to promote the teaching of basic computer science in schools and developing countries. The original model became far more popular than anticipated, selling outside its target market for uses such as robotics. It does not include peripherals (such as keyboards and mice) and cases. However, so
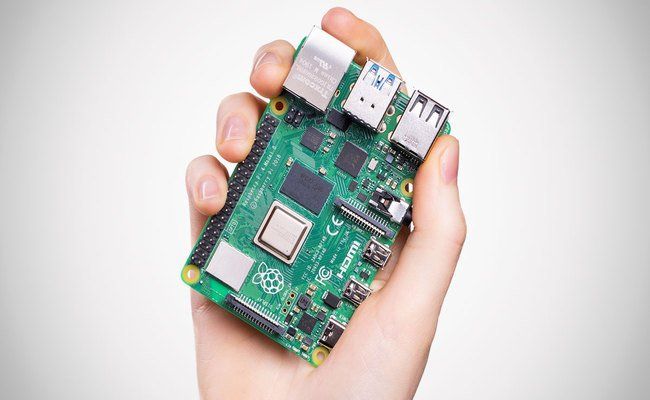
If you don’t know what Raspberry Pi 4 is, then you have landed in the right place.
The Raspberry Pi is a series of small single-board computers developed in the United Kingdom by the Raspberry Pi Foundation to promote the teaching of basic computer science in schools and developing countries. The original model became far more popular than anticipated, selling outside its target market for uses such as robotics. It does not include peripherals (such as keyboards and mice) and cases. However, some accessories are packed in several official and unofficial bundles.
The organization behind the Raspberry Pi consists of two arms. Raspberry Pi Foundation developed the first two models. After the launch of the Pi Model B, the Foundation set up Raspberry Pi Trading. At that time, Eben Upton was the CEO. Furthermore, the Foundation developed the third model, the B+. Raspberry Pi Trading is responsible for developing technology while the Foundation is an educational charity to promote the teaching of basic computer science in schools and developing countries.
What’s new in Raspberry Pi 4?
- Dual display (4K) support: With this feature, you can now connect two displays to this desktop computer, and that too in 4K.
- Better performance: The new Raspberry Pi 4 comes with a new, updated processor and RAM, which guarantees you a new desktop experience.
- Fast networking: The Pi 4 comes with Gigabit Ethernet, along with onboard wireless networking and Bluetooth.
- RAM: Raspberry Pi 4 comes in three variants based on RAM: 1 GB, 2 GB, and 4 GB.
- USB 3: The new Raspberry Pi 4 has upgraded USB capacity: along with two USB 2 ports, you will find two USB 3 ports, which can transfer data up to ten times faster.
Technical specifications
- Broadcom BCM2711, Quad-core Cortex-A72 (ARM v8) 64-bit SoC @ 1.5GHz
- 1GB, 2GB, or 4GB LPDDR4-2400 SDRAM (depending on model)
- 2.4 GHz and 5.0 GHz IEEE 802.11ac wireless, Bluetooth 5.0, BLE
- Gigabit Ethernet
- 2 USB 3.0 ports; 2 USB 2.0 ports.
- Raspberry Pi standard 40-pin GPIO header (fully backward compatible with previous boards)
- 2 × micro-HDMI ports (up to 4kp60 supported)
- 2-lane MIPI DSI display port
- 2-lane MIPI CSI camera port
- 4-pole stereo audio and composite video port
- H.265 (4kp60 decode), H264 (1080p60 decode, 1080p30 encode)
- OpenGL ES 3.0 graphics
- Micro-SD card slot for loading operating system and data storage
- 5V DC via USB-C connector (minimum 3A*)
- 5V DC via GPIO header (minimum 3A*)
- Power over Ethernet (PoE) enabled (requires separate PoE HAT)
- Operating temperature: 0 – 50 degrees C ambient
* A good quality 2.5A power supply can be used if downstream USB peripherals consume less than 500mA in total.
Setting up the Raspberry Pi 4
What you will need
A power supply: There is a USB Type-C port included in the device. You need a power supply with at least 3.0 A power.
Micro-SD card: You will need this to store its files and the Raspbian OS. The minimum storage requirement is 8 GB. Many sellers provide micro-SD cards with the Raspbian OS pre-installed, so you’re ready to go.
Keyboard and mouse: To start using the Raspberry Pi 4, you need a USB keyboard and a USB mouse. Both are mandatory for the first installation. After setting it up, you can also use a Bluetooth keyboard and mouse.
TV/Computer screen: To display the content inside the computer, you need a TV or computer screen, and a cable to link Raspberry and the display. If your monitor has speakers installed in it, Pi 4 will use it. The port required here is a micro-HDMI port. If you have a different cable like standard HDMI, DVI, and VGA cable, then you will need their respective micro-HDMI converters. For instance, if your monitor supports VGA, then use a VGA-to-micro-HDMI adapter with it. This way you will be able to use your VGA cable.
These are the essential requirements needed before setting up the Raspberry Pi 4. You can also install add-ons like a protective case, headphones/speakers, and an Ethernet cable.
Setting up the SD card
If your SD card does not have the Raspbian operating system, you can do it yourself. All you need to do is to use a laptop with an installed SD card slot. Most of the latest laptops have this feature.
Download Raspbian OS via NOOBS
Using NOOBS to install the Raspbian operating system is the easiest way to go.
Most importantly, advanced users who want to install a particular operating system should refer to this guide to install operating system images.
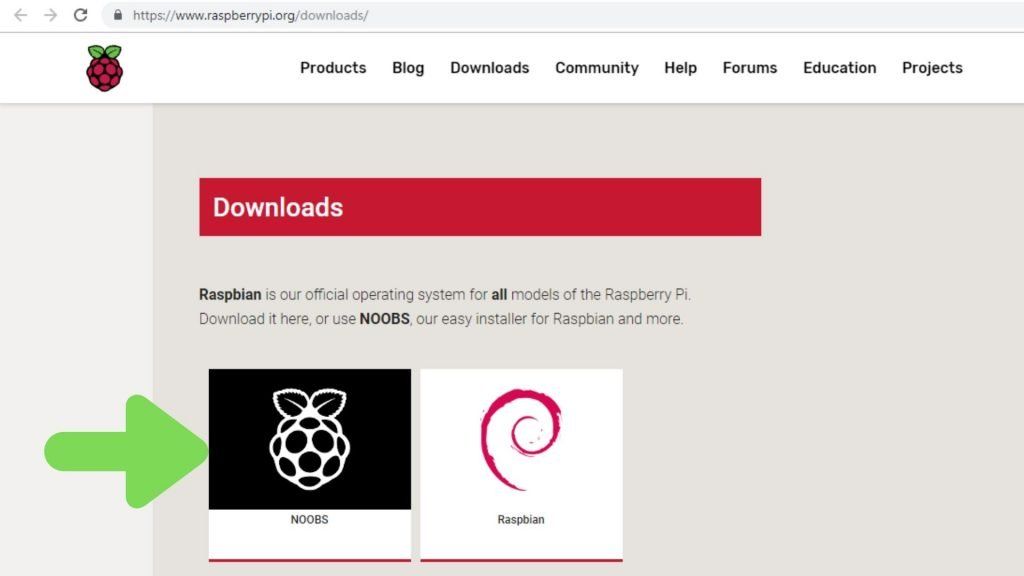
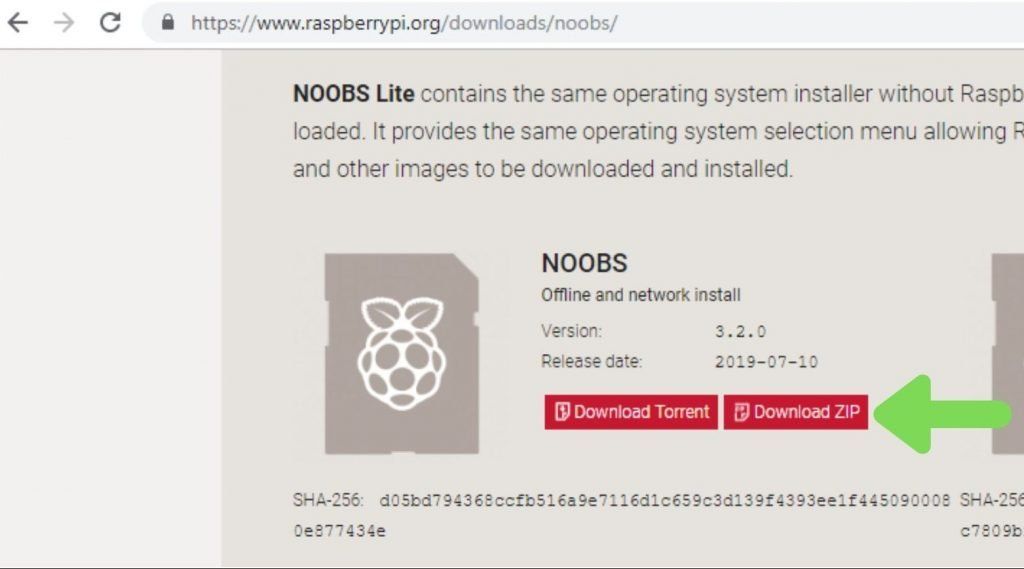
Steps to download and transfer NOOBS to the micro-SD card
- Visit the Raspberry downloads page. Then click on the box which has NOOBS written on it.
- The simplest method is to download the ZIP file. Make sure you are aware of where you are downloading the file, so it will be easy to find it in the future.
- Format your SD card. If it has older files of Raspbian or any other personal files, back them up first, then proceed.
- Now extract the files from the ZIP file you downloaded from NOOBS.
- Open another explorer window and navigate to the SD card.
- Use “Ctrl+A” to select all the files first, then use “Ctrl+C” to copy all of them.

- Now go to your SD card folder, and paste all of it by pressing “Ctrl+V”.

- The files are now stored on your micro-SD card.

- Now you can eject the micro-SD card.
Connect the Raspberry Pi 4
Install all the required components into the mini device. The set-up has to be done in a particular order to make sure that the components are safe.
- First, insert the micro-SD card on the underside slot of the Raspberry Pi 4.
- Take the USB port of your mouse cable, and connect it to the USB port on Raspberry Pi 4.
- Connect the keyboard in the same way.
- Make sure you plug your screen into a socket and turn it ON.
- Connect the TV/computer monitor to your device using a micro-HDMI cable, or an adapter if required. Insert the micro-HDMI female part into the port named HDMI0 in Raspberry Pi.
- To connect Raspberry Pi 4 to the internet via Ethernet, connect an Ethernet cable linked to a WiFi router or a broadband connection.
- If your screen has speakers embedded in it, the Raspberry Pi will use those. If you do not want to use those speakers or there are no speakers on your monitor, you can use external audio devices like headphones and speakers by connecting them via a headphone jack.
Booting the Raspberry Pi 4
This computer does not have a power button, so as soon as you connect the power supply and turn it on, it boots up.
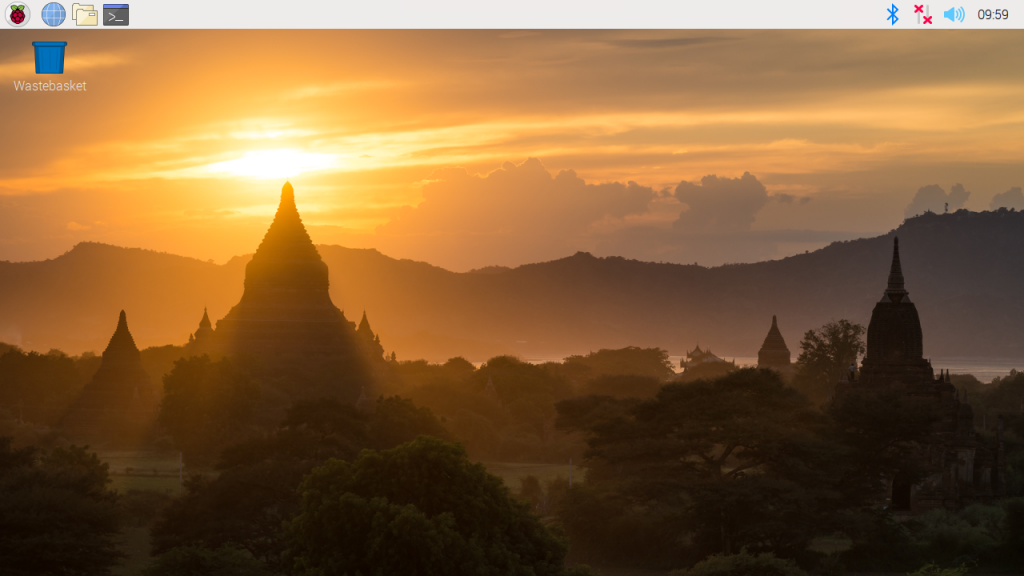
You should see a red LED light glowing in the device. This is an indication that Raspberry is connected to power. Soon, as it boots up, you will see raspberries on the left of your screen.
After a few seconds, the Raspbian desktop will appear.
Finishing the setup
When you start the Raspberry Pi 4 for the first time, you will see the Welcome to Raspberry Pi pop-up. This will guide you to the initial setup.
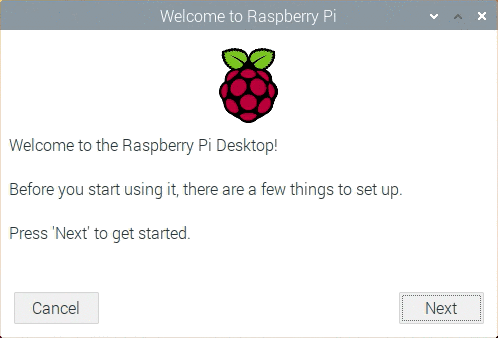
- Click “Next” to start the setup.
- Then set the country, language, and timezone. Click “Next” again.
- Enter a new password.
- Connect to a WiFi network by selecting its name and entering the password.
- Let the wizard check for updates and if there are any, install them. This may take a little while.
- Click Done or Restart to finish the setup.
What’s next?
Check out these digital projects, controlled using Raspberry Pi 4.
Applications
I hope by now that you have understood the setup of Raspberry Pi 4. Now let us have a look at some cool uses of this device.
1. Stop motion camera
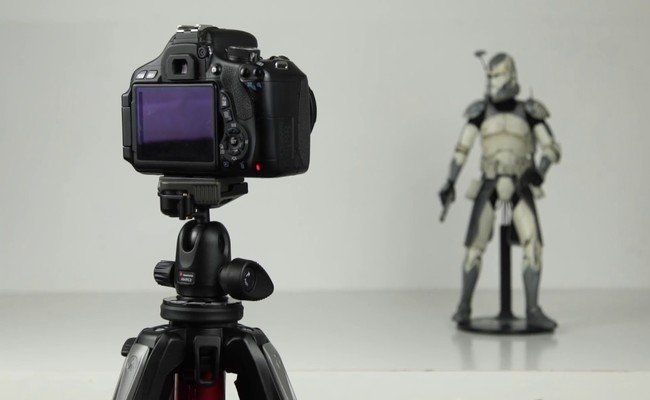
You know that everybody loves stop motion. To create your digital stop motion camera, you will need a Raspberry Pi 4 and a dedicated camera module.
The process of creating a camera is time-consuming. You will need Python, a camera with a tripod, and a well-lit area. For satisfactory results, it will take time and practice.
You’ll need a breadboard to mount a button (unless you already have a suitable plunger button that can be connected to the Raspberry Pi’s GPIO), and a Python script to snap each image.
2. Web server
Wow, you can now configure your Raspberry Pi 4 to host a website. It can host your blog, too.
There are two ways to do this. Either install Apache and its associated libraries. Or install a full LAMP stack, with PHP and MySQL alongside Apache. Setting up FTP is recommended.
Once these steps are completed, you can add the HTML files into the \www\ directory, and your web server is ready. Or you can install a specific website like WordPress.
To get your website online, you will need a static IP address from your service provider. If you find this method expensive, go to No-IP.com.
3. Network monitoring tool
Do you want to monitor devices in your network? Are you concerned about the lack of connectivity?
Then the best solution for you is to create a network monitoring tool. There are many tools available on the internet. The Nagios tool is one of the best tools, as it is easier to configure and operate.
With the Nagios tool, you can easily monitor uptime, and view a visualization of the devices connected.
To use the Nagios tool, simply flash its disk image to the SD card installed in your Raspberry Pi 4.
4. Stream live video on YouTube
Another way to take advantage of a Raspberry Pi 4 is to live stream to YouTube.
To live stream, a compatible USB camera is necessary.
Be prepared with your YouTube channel with the library-tools package installed. There is a detailed tutorial for streaming a video live on YouTube, available on the Raspberry Pi 4. You can visit that for detailed instructions.
5. Learn to code
When this device had its inception in 2012, one of its primary motives was to teach kids to code. However, it isn’t just kids who can learn to code. Adults and elders can also take advantage of the in-built coding tools available on the Raspberry Pi 4.
There are many pieces of software available in Raspbian that provide basic programming skills. But the most important is Scratch.
Designed to cater to all levels, Scratch is a block-based programming tool, that eschews the complexities of inputting lines of code. Instead, you simply drag the commands into place. You can see the impact of your commands in the code view and export the code as a program to run.
Scratch is simple enough to manipulate lights installed in the Pi’s GPIO and complex enough to program basic games.
If you want to buy this awesome desktop computer, visit this site.
Final word
With this article, I have tried my best to explain to you the Raspberry Pi 4, and the setup process. I hope you got a good idea about the device now. Feel free to comment on your favorite Raspberry project, and do remember one thing,
“Never cease to learn.”
🚀 Try Codersera Free for 7 Days
Connect with top remote developers instantly. No commitment, no risk.
Tags
Trending Blogs
Discover our most popular articles and guides

10 Best Emulators Without VT and Graphics Card: A Complete Guide for Low-End PCs
Running Android emulators on low-end PCs—especially those without Virtualization Technology (VT) or a dedicated graphics card—can be a challenge. Many popular emulators rely on hardware acceleration and virtualization to deliver smooth performance.

Android Emulator Online Browser Free
The demand for Android emulation has soared as users and developers seek flexible ways to run Android apps and games without a physical device. Online Android emulators, accessible directly through a web browser.

Free iPhone Emulators Online: A Comprehensive Guide
Discover the best free iPhone emulators that work online without downloads. Test iOS apps and games directly in your browser.
10 Best Android Emulators for PC Without Virtualization Technology (VT)
Top Android emulators optimized for gaming performance. Run mobile games smoothly on PC with these powerful emulators.

Gemma 3 vs Qwen 3: In-Depth Comparison of Two Leading Open-Source LLMs
The rapid evolution of large language models (LLMs) has brought forth a new generation of open-source AI models that are more powerful, efficient, and versatile than ever.

ApkOnline: The Android Online Emulator
ApkOnline is a cloud-based Android emulator that allows users to run Android apps and APK files directly from their web browsers, eliminating the need for physical devices or complex software installations.

Best Free Online Android Emulators
Choosing the right Android emulator can transform your experience—whether you're a gamer, developer, or just want to run your favorite mobile apps on a bigger screen.
Gemma 3 vs Qwen 3: In-Depth Comparison of Two Leading Open-Source LLMs
The rapid evolution of large language models (LLMs) has brought forth a new generation of open-source AI models that are more powerful, efficient, and versatile than ever.


