
fetch(url) for a GET, or pass an options object with method, headers, and a JSON body for POST, PUT, and DELETE. Always check response.ok before parsing, because fetch only rejects on network failure, not on 404 or 500 errors.
The fetch() function is the standard way to make HTTP requests in JavaScript. It works natively in every modern browser and in Node.js (18+), so the same code runs in the front end and on the server. This guide walks through GET, POST, PUT and DELETE requests, plus the parts most tutorials skip: proper error handling, authentication headers, timeouts, and reusable wrappers.
Before fetch() arrived, you made HTTP requests with XMLHttpRequest (XHR). XHR needed separate listeners for success and error, plus calls to open() and send(). It worked, but it was verbose and callback-heavy:
// The old XMLHttpRequest way (for reference only)
const xhr = new XMLHttpRequest();
xhr.open('GET', 'https://api.example.com/users', true);
xhr.onload = function () {
  if (xhr.status === 200) {
    console.log(JSON.parse(xhr.responseText));
  }
};
xhr.onerror = function () {
  console.error('Request failed');
};
xhr.send();
What is the Fetch API?
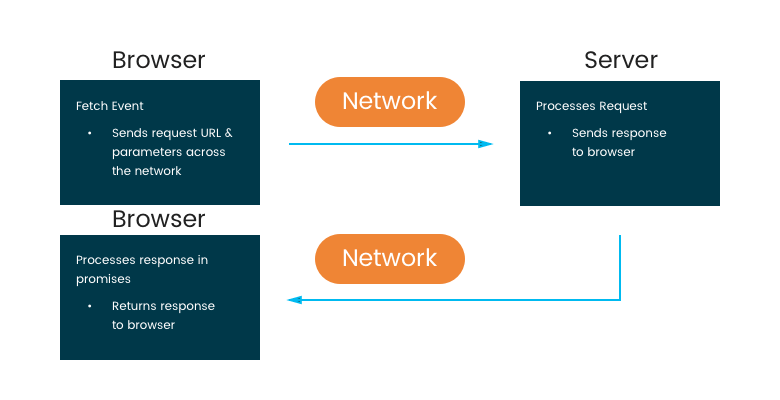
The Fetch API provides a JavaScript interface for making network requests and handling responses. Its fetch() method returns a Promise, which means you can use async/await or .then() chains instead of the nested callbacks XHR required.
The only mandatory argument is the URL of the resource you want. A second, optional argument is a configuration object where you set the HTTP method, headers, and body. The four methods you will use most are:
- GET — read data
- POST — create a new resource
- PUT — replace or update an existing resource
- DELETE — remove a resource
How do you make a GET request with fetch()?
GET is the default method, so you only need to pass the URL. GET requests read data without changing anything on the server, which makes them both safe and idempotent.
const url = 'https://api.example.com/tasks';

async function getTasks() {
  const response = await fetch(url);

  // fetch does NOT throw on 404/500 — check response.ok yourself
  if (!response.ok) {
    throw new Error(`GET failed: ${response.status}`);
  }

  const data = await response.json();
  return data;
}
Notice the response.ok check. This is the single most common mistake with fetch, so it gets its own section below.
How do you send data with a POST request?
POST sends data to the server to create a new resource. Unlike GET, you must specify the method, a Content-Type header, and a request body. The body is usually JSON, so stringify your object before sending it.
const url = 'https://api.example.com/tasks';

const newTask = {
  userId: 11,
  title: 'Write the fetch guide',
  completed: false,
};

async function createTask(data) {
  const response = await fetch(url, {
    method: 'POST',
    headers: {
      'Content-Type': 'application/json',
    },
    body: JSON.stringify(data),
  });

  if (!response.ok) {
    throw new Error(`POST failed: ${response.status}`);
  }

  return response.json();
}

createTask(newTask).then(console.log).catch(console.error);
You do not assign an ID yourself — the server creates one and returns it in the response. POST is non-idempotent: calling it twice can create two resources.
What's the difference between PUT and DELETE?
PUT updates an existing resource at a specific URL. You send the complete new version of the resource in the body. Unlike POST, PUT is idempotent — calling the same PUT request repeatedly produces the same result.
const url = 'https://api.example.com/tasks/5';

const updatedTask = {
  userId: 1,
  id: 5,
  title: 'Updated task title',
  completed: true,
};

async function updateTask(data) {
  const response = await fetch(url, {
    method: 'PUT',
    headers: {
      'Content-Type': 'application/json; charset=UTF-8',
    },
    body: JSON.stringify(data),
  });

  if (!response.ok) {
    throw new Error(`PUT failed: ${response.status}`);
  }

  return response.json();
}
DELETE removes the resource at the given URL. It usually needs no body — just the method and the target URL.
const url = 'https://api.example.com/tasks/3';

async function deleteTask() {
  const response = await fetch(url, {
    method: 'DELETE',
  });

  if (!response.ok) {
    throw new Error(`DELETE failed: ${response.status}`);
  }

  // Many DELETE endpoints return 204 No Content, so guard the parse
  return response.status === 204 ? null : response.json();
}
Why do you need to check response.ok?
This is the gotcha that trips up almost everyone. fetch() only rejects its promise on a network failure — a dropped connection, DNS error, or CORS block. An HTTP error such as 404 Not Found or 500 Internal Server Error is still a successful fetch, so the promise resolves normally.
That means a naive try/catch will silently swallow a 404. Always inspect response.ok (true for status codes 200–299) or response.status, and throw yourself when the server returns an error:
async function safeFetch(url, options) {
  const response = await fetch(url, options);

  if (!response.ok) {
    // Pull the server's error message if there is one
    const detail = await response.text();
    throw new Error(`HTTP ${response.status}: ${detail}`);
  }

  return response.json();
}
How do you add authentication headers?
Most APIs require authentication. You pass credentials through the Authorization header (note the spelling — it is Authorization, not "Authenticate"). Two common schemes:
Bearer token (the standard for modern REST APIs, defined in RFC 6750):
const url = 'https://api.example.com/tasks';

async function fetchWithToken(token) {
  const response = await fetch(url, {
    headers: {
      'Content-Type': 'application/json',
      Authorization: `Bearer ${token}`,
    },
  });

  if (!response.ok) {
    throw new Error(`Auth request failed: ${response.status}`);
  }

  return response.json();
}
Basic auth requires the user:password pair to be Base64-encoded — do not send it in plain text:
// In the browser use btoa(); in Node use Buffer.from(...).toString('base64')
const credentials = btoa('user:password');

const response = await fetch(url, {
  headers: {
    Authorization: `Basic ${credentials}`,
  },
});
Never hard-code secrets in front-end code that ships to the browser. Keep long-lived keys on a server route and expose only short-lived tokens to the client.
How do you set a fetch timeout?
fetch() has no built-in timeout, so a slow endpoint can hang indefinitely. Use AbortController (or the newer AbortSignal.timeout()) to cancel a request after a set time.
// Simplest form (browsers + Node 18.11+)
async function fetchWithTimeout(url, ms = 5000) {
  try {
    const response = await fetch(url, { signal: AbortSignal.timeout(ms) });
    if (!response.ok) throw new Error(`HTTP ${response.status}`);
    return await response.json();
  } catch (error) {
    if (error.name === 'TimeoutError') throw new Error('Request timed out');
    throw error;
  }
}
If you need to support older runtimes, wire up an AbortController with setTimeout manually and clear the timer once the response arrives:
async function fetchWithController(url, ms = 5000) {
const controller = new AbortController();
const timer = setTimeout(() => controller.abort(), ms);
try {
const response = await fetch(url, { signal: controller.signal });
return await response.json();
} finally {
clearTimeout(timer);
}
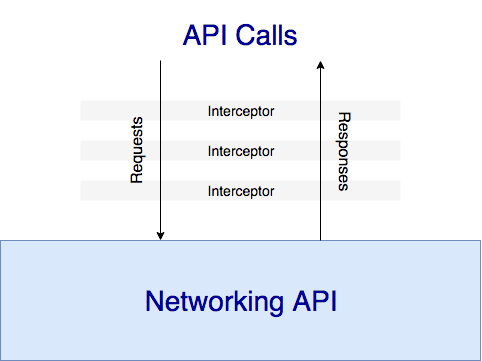
}How do you reuse fetch logic with interceptors?
Interceptors let you run shared logic — attaching a token, logging, rewriting URLs — before every request or after every response, without repeating it at each call site. Native fetch() has no interceptors, but the pattern is easy to replicate by wrapping fetch in a single helper.
// A tiny wrapper that intercepts every request and response
const BASE_URL = 'https://api.example.com';

async function apiClient(path, options = {}) {
  const token = localStorage.getItem('token');

  // Request interceptor: attach auth + defaults
  const config = {
    ...options,
    headers: {
      'Content-Type': 'application/json',
      ...(token && { Authorization: `Bearer ${token}` }),
      ...options.headers,
    },
  };

  const response = await fetch(`${BASE_URL}${path}`, config);

  // Response interceptor: central error handling
  if (!response.ok) {
    if (response.status === 401) {
      // e.g. redirect to login or refresh the token
    }
    throw new Error(`HTTP ${response.status}`);
  }

  return response.json();
}

// Usage stays clean everywhere
// await apiClient('/tasks');
// await apiClient('/tasks', { method: 'POST', body: JSON.stringify(data) });
If you prefer a ready-made library, fetch-intercept registers global request/response hooks (yarn add fetch-intercept), but a small wrapper like the one above is usually clearer and dependency-free.
Conclusion
The Fetch API gives you a clean, promise-based way to talk to any HTTP endpoint from the browser or Node.js. Master the four core methods (GET, POST, PUT, DELETE), always check response.ok before parsing, send credentials through the Authorization header, guard slow calls with a timeout, and centralise shared logic in a wrapper. With those habits, your API calls stay safe, readable, and easy to maintain.
Building a data-heavy app and need experienced engineers who write this kind of production-ready code? Hire vetted remote developers through Codersera and extend your team with a risk-free trial.
FAQ
Does fetch() throw an error on a 404 or 500 response?
No. fetch() only rejects its promise on a network failure, such as a lost connection or a CORS block. HTTP error statuses like 404 and 500 still resolve successfully, so you must check response.ok or response.status and throw the error yourself.
How do I send JSON in a POST request with fetch?
Set method: 'POST', add a 'Content-Type': 'application/json' header, and pass your data through body: JSON.stringify(data). The body must be a string, so always stringify the object before sending it.
What is the difference between PUT and POST?
POST creates a new resource and is non-idempotent — calling it twice can create two records. PUT updates or replaces an existing resource at a known URL and is idempotent, so repeating the same request produces the same result.
How do I add a timeout to fetch?
fetch has no native timeout. Pass signal: AbortSignal.timeout(5000) to cancel after five seconds in modern browsers and Node 18.11+, or use an AbortController with setTimeout for wider compatibility.
Can I use fetch() in Node.js?
Yes. fetch() is available globally in Node.js 18 and later, with no extra package needed. The same request code you write for the browser runs on the server, which makes it ideal for API routes and back-end scripts.
How do I pass an authentication token with fetch?
Add an Authorization header. For modern REST APIs use Authorization: Bearer <token>. For Basic auth, Base64-encode the user:password string with btoa() and send Authorization: Basic <encoded>.