
In this Flutter Tutorial, we will help you build and install your very first flutter app that will be a Personal Expense with rich UI and complete functionalities. After this tutorial, you can make your own apps and can publish them on App Store and Play Store.
So What Is Flutter?
Flutter is Google’s mobile app SDK for crafting high-quality native interfaces on iOS and Android in record time. Flutter works with existing code, is used by developers and organizations around the world, and is free and open source. Flutter works on one codebase but results in building native apps for both Android and iOS.
Basic Requirements Before Starting With Flutter
- Knowledge of Dart, which is essential for developing Flutter Applications. Learn more about Dart from https://dart.dev/guides.
Architecture of Flutter

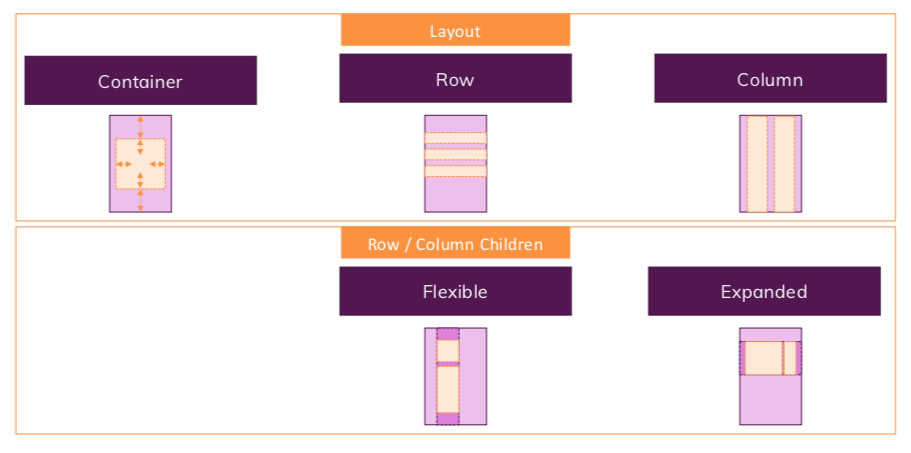
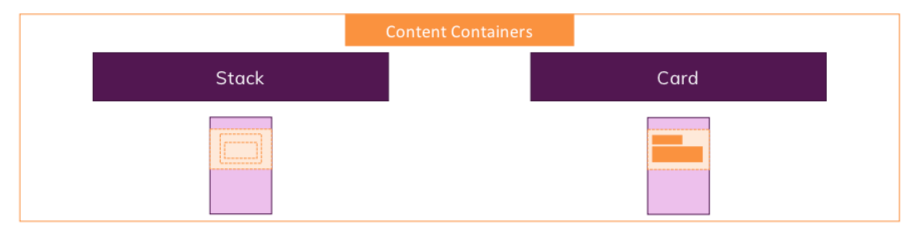
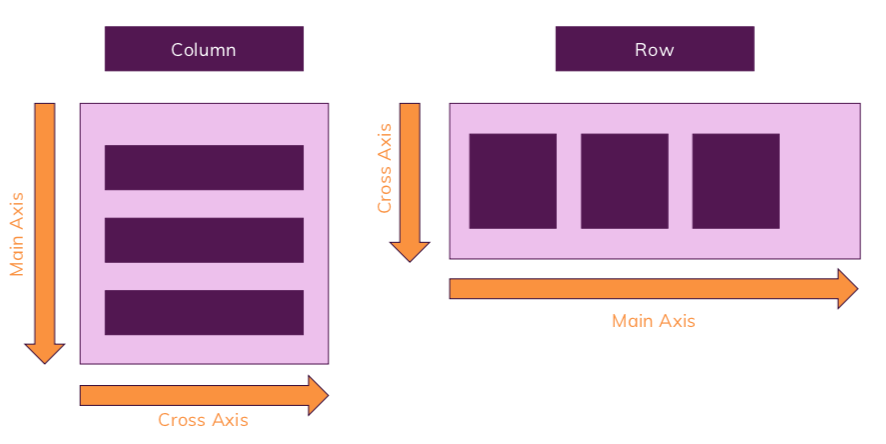
Everything is a widget in Flutter App. Flutter gives you a plethora of widgets for building rich UI with powerful functionalities. There may be more than one way of achieving the same UI or functionality in Flutter. Flutter embraces Platform Differences, which means if you want to make your app function in one way in Android but differently in iOS and even if you want to make your app function differently in different device sizes. Flutter works on One Codebase but results in having an app for both iOS and Android, it is just the same as Learn Once Write Anywhere.
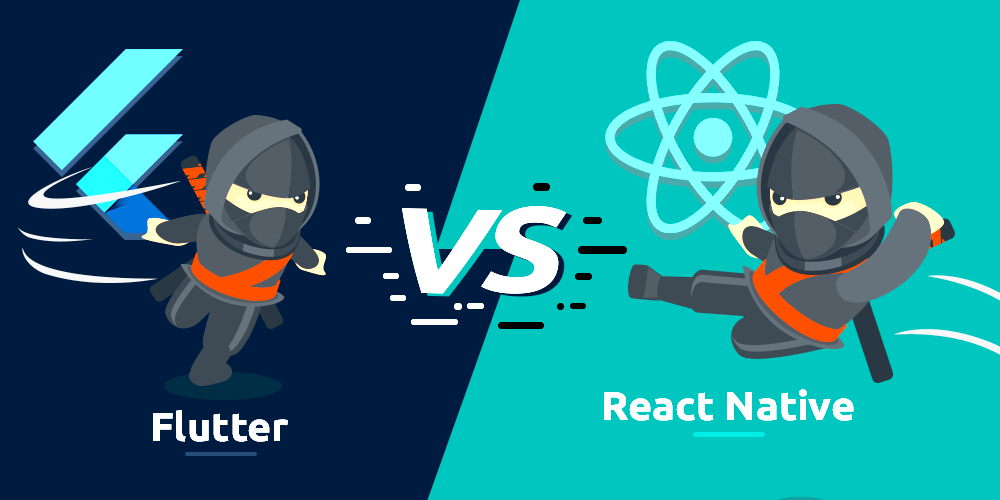
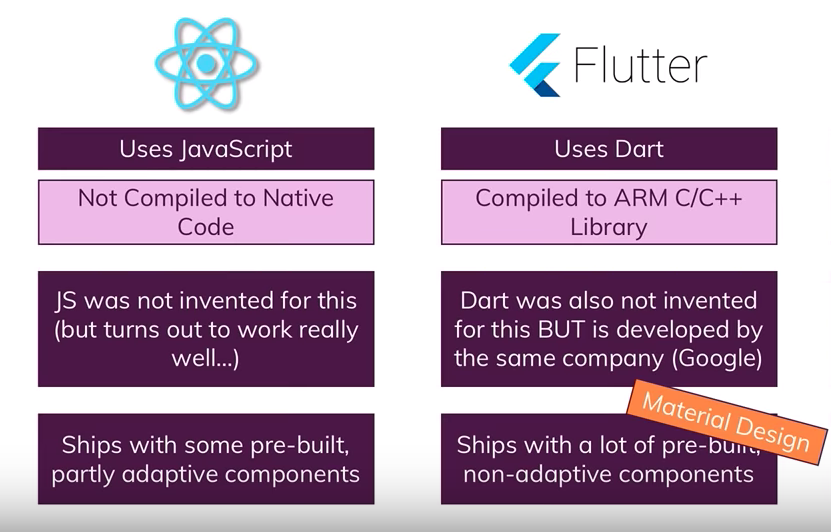
Comparison between the two giants
Important Resources
- https://flutter.dev/docs/development/ui/widgets
- https://dart.dev/guides
- Spend as much time as possible on the flutter widget catalog URL, it will help you to enhance your knowledge you will stay up to date with community work, you will get to know many possible ways for achieving the same target.
Let’s start with installing Flutter into your system
Reach to website https://flutter.dev/docs/get-started/install
1. Click on your system’s OS, and then download the Flutter SDK.
2. If you are Mac or Linux user:-
3. Extract the file in the desired location, for example:
cd ~/development
#flutter version might be different in your case
tar xf ~/Downloads/flutter_linux_v1.7.8+hotfix.4-stable.tar.xz- Open (or create)
$HOME/.bash_profile. The file path and filename might be different on your machine. - Add the following line and change
[PATH_TO_FLUTTER_GIT_DIRECTORY]to be the path where you cloned Flutter’s git repo:
export PATH=$PATH:[PATH_TO_FLUTTER_GIT_DIRECTORY]/flutter/bin- Run
source $HOME/.bash_profileto refresh the current window. - Verify that the
flutter/bindirectory is now in your PATH by running:
echo $PATH4. If you are Windows User:-
- Extract the zip file and place the contained
flutterin the desired installation location for the Flutter SDK (for example,C:\src\flutter; do not install Flutter in a directory likeC:\Program Files\that requires elevated privileges). - Locate the file
flutter_console.batinside theflutterdirectory. Start it by double-clicking. - From the Start search bar, type ‘env’ and select Edit environment variables for your account.
- Under User variables check if there is an entry called Path:
- If the entry does exist, append the full path to
flutter\binusing;as a separator from existing values. - If the entry does not exist, create a new user variable named
Pathwith the full path toflutter\binas its value.
Note that you have to close and reopen any existing console windows for these changes to take effect.
5. Run flutter doctor
From a console window that has the Flutter directory in the path (see above), run the following command to see if there are any platform dependencies you need to complete the setup:content_copy
C:\src\flutter>flutter doctorThis command checks your environment and displays a report of the status of your Flutter installation. Check the output carefully for other software you might need to install or further tasks to perform (shown in bold text).
6. You need to set up either Android Emulator or iOS simulator into your device, which is really easy. You can download them from here:-
To install Android Studio:-
- Download and install Android Studio.
- Start Android Studio, and go through the ‘Android Studio Setup Wizard’. This installs the latest Android SDK, Android SDK Platform-Tools, and Android SDK Build-Tools, which are required by Flutter when developing for Android.
7. Install VS Code in your System and install extensions named Dart and Flutter
Let’s get started with our Personal Expenses App Tutorial
- Run flutter to create expenses, to create to new flutter project named expenses.
#to create new flutter project in your favorite location
flutter create expenses
#get into the directory
cd expenses

#run flutter emulators to know about the emulators in your system
flutter emulators
#to open emulator, you can get to know about emulator id from above command
flutter emulators --launch <emulator id>
#to open project in emulator
flutter run
2. Important concepts, widgets and layouts that we are gonna use in this project!!!


3. We have to just work on the lib directory and some work on pubspec.yaml, rest of the directories and files are necessary for flutter and its usage for building native apps for both Android and iOS from one codebase.
4. Open lib -> main.dart file, then click on debug -> Start Without Debugging from the menu of VS Code. You will either be prompt to open an emulator in VS Code or if any emulator is open in your system then by default it opens the app in it and it also opens Debug Console in your app and a menu bar, this menu bar will help you sync your code with the emulator as you give it action.


5. Now let’s remove everything from main.dart file to understand flutter from scratch. Let’s first write the main method, which will be the first thing that Flutter runs in the whole app. In the main method, we execute flutter’s inbuilt function runApp from flutter’s widget library which inflates the given widget/class and attaches it to the screen, and we pass the class’s object as MyApp(), without a new keyword like a function which you may familiar from other languages, those parentheses represent constructor.
 #file: main.dart

#this is the short hand way to write those functions which has just one thing to do in dart
#here we run flutter method runApp which takes a class as argument
#We will soon form class MyApp
void main() => runApp(MyApp());
6. Now let’s form our class MyApp and import material.dart from flutter package. Here we need to extend StatelessWidget for our class so that we can override its methods. Therefore inside the class, we had overridden build method from StatelessWidget class which is of type Widget and take BuildContext type as argument and returns any Widget. So here, we return the widget (MaterialApp) from imported material.dart file. You may observe that widgets are simple dart classes. Now as MaterialApp is a widget so it takes named arguments inside its constructor, like title and home so that order don’t matter. We will soon learn how can we make our own class’s constructors which will take named arguments.
#file: main.dart

import 'package:flutter/material.dart';

#we will soon form MyHomePage class in this project
........
class MyApp extends StatelessWidget{
//use of override annotation is not necessary but it is good to have as you can form your own build method, so to differentiate and even for implementing all necessary properties and methods
  @override
  Widget build(BuildContext context) {
    return MaterialApp(
      title: 'FlutterApp',
      home: MyHomePage(),
    );
  }
}
7. Let’s form MyHomePage class now, it will be our Stateful class,
A StatelessWidget will never rebuild by itself (but can from external events). A StatefulWidget can. That is the golden rule.
But any kind of widget can be repainted at any time.
Stateless only means that all of its properties are immutable and that the only way to change them is to create a new instance of that widget. It doesn’t e.g. lock the widget tree.
Here we had formed private methods and variables, we form private variables, methods, and classes by _(underscore) in a flutter. Observe carefully how we form state here, this is how we form Stateful Widgets in Flutter. We used Flutter’s material. dart provided Widgets here, You can even get to understand these widgets through the Widget Catalogue of Flutter and how these work.
createState() -> Creates the mutable state for this widget at a given location in the tree.
#file: main.dart
import 'package:flutter/material.dart';
................
class MyHomePage extends StatefulWidget {
// createState method is coming from StatefulWidget
@override
_MyHomePageState createState() => _MyHomePageState();
}
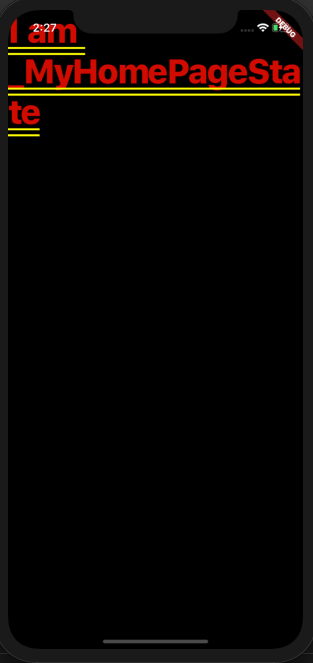
class _MyHomePageState extends State<MyHomePage> {
@override
Widget build(BuildContext context) {
return Text('I am _MyHomePageState');
}
}
8. Let’s form a simple dart class named Transaction, here we used the @required inside argument so that whenever we form objects of this class then we must define all required keys into the constructor, and { } in the argument is for adding these properties in the constructor in the form of key-value pairs with specified names in this class, and to use these we need to import foundation.dart file. This is what we were talking about in step 6.
#file: transaction.dart
import 'package:flutter/foundation.dart';
class Transaction{
String id;
String title;
double amount;
DateTime date;
Transaction({@required this.id, @required this.title, @required this.amount, @required this.date});
//this is the alternate way to write constructor in dart file of:-
// Transaction({ @required id, @required title, @required amount, @required
// date }){
// this.id = id,
// this.title = title,
// this.amount = amount,
// this.date = date
//}
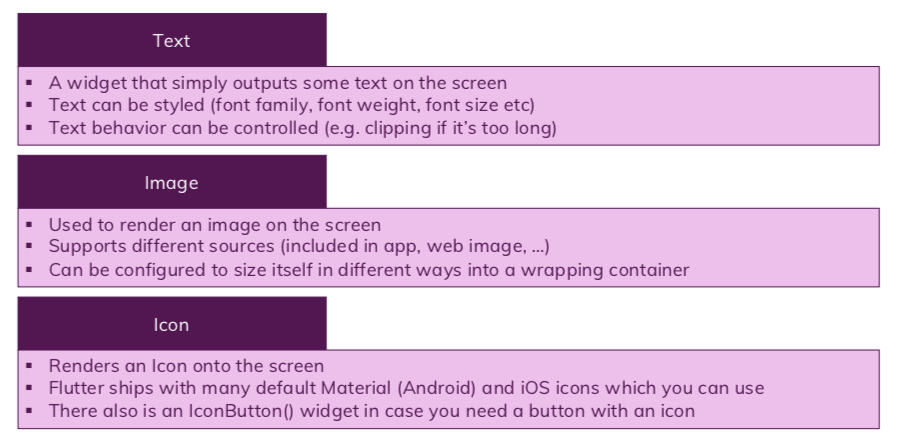
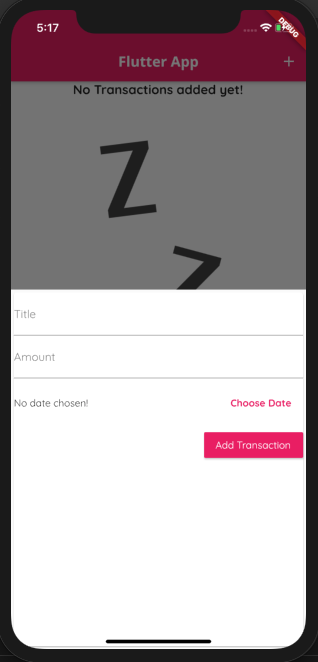
}9. Let’s add some fonts and an image to our project which we will use later, and you will learn how to configure your app with different settings.
You need to add file waiting.png in the directory [our project]/assets/images/
Your pubspec.yaml file will look like this after removing all comments and adding the required fonts and images.
#file: pubspec.yaml

...................
dependencies:
  flutter:
    sdk: flutter
  intl: ^0.15.8

  cupertino_icons: ^0.1.2

dev_dependencies:
  flutter_test:
    sdk: flutter


flutter:
  uses-material-design: true

  assets:
    - assets/images/waiting.png

  fonts:
    - family: OpenSans
      fonts:
        - asset: assets/fonts/OpenSans-Regular.ttf
        - asset: assets/fonts/OpenSans-Bold.ttf
          weight: 700
    - family: Quicksand
      fonts:
        - asset: assets/fonts/Quicksand-Regular.ttf
        - asset: assets/fonts/Quicksand-Bold.ttf
          weight: 700
10. Let’s add a global theme to our project so that, we don’t require to add the same stylings to each widget repeatedly, Flutter gives us this functionality so that we can change our theme in one place as necessary and can even provide user to choose his favourite one.
So, let’s open the main.dart file’s MyApp class.
#file: main.dart

...............
Widget build(BuildContext context) {
    return MaterialApp(
      title: 'FlutterApp',
      home: MyHomePage(),
      theme: ThemeData(
        primarySwatch: Colors.pink,
        accentColor: Colors.black,
        fontFamily: 'Quicksand',
        appBarTheme: AppBarTheme(
          textTheme: ThemeData.light().textTheme.copyWith(
            title: TextStyle(
              fontFamily: 'OpenSans',
              fontSize: 20,
              fontWeight: FontWeight.bold,
            )
          )
        ),
        textTheme: ThemeData.light().textTheme.copyWith(
          title: TextStyle(
            fontFamily: 'OpenSans',
            fontSize: 18,
            fontWeight: FontWeight.bold,
          )
        )
      ),
    );
  }
................
11. Let’s form a new file named transaction_list.dart which will show the list of transactions, Let’s here install new package named intl package, intl package helps to format the dates in our project as specified:-
Add this to your package’s pubspec.yaml file:
dependencies:
  intl: ^0.15.2
You can install packages from the command line:
with pub:
$ pub get#file transaction_list.dart
import 'package:flutter/material.dart';
import 'package:intl/intl.dart';
import '../models/transaction.dart';
class TransactionList extends StatelessWidget {
final List<Transaction> transactions;
final Function deleteTx;
//constructor
TransactionList(this.transactions, this.deleteTx);
@override
Widget build(BuildContext context) {
return Container(
height: 550,
child: this.transactions.isEmpty ? Column(
children: <Widget>[
Text(
'No Transactions added yet!',
//this is how we use our theme from main.dart file
style: Theme.of(context).textTheme.title,
),
//Used to give some vertical space
SizedBox(
height: 60,
),
Container(
height: 400,
//Use of our image which we had configured
child: Image.asset(
'assets/images/waiting.png',
fit: BoxFit.cover,
),
),
],
) :
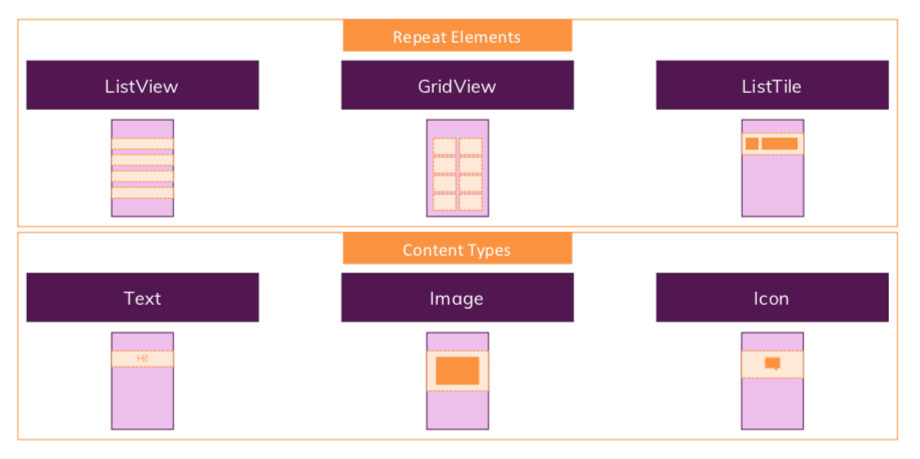
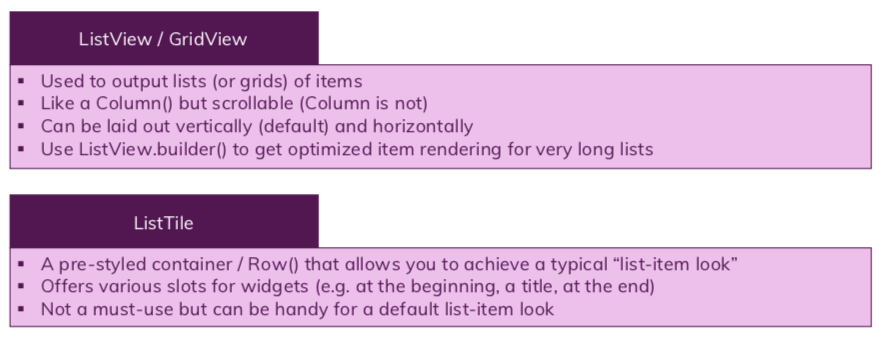
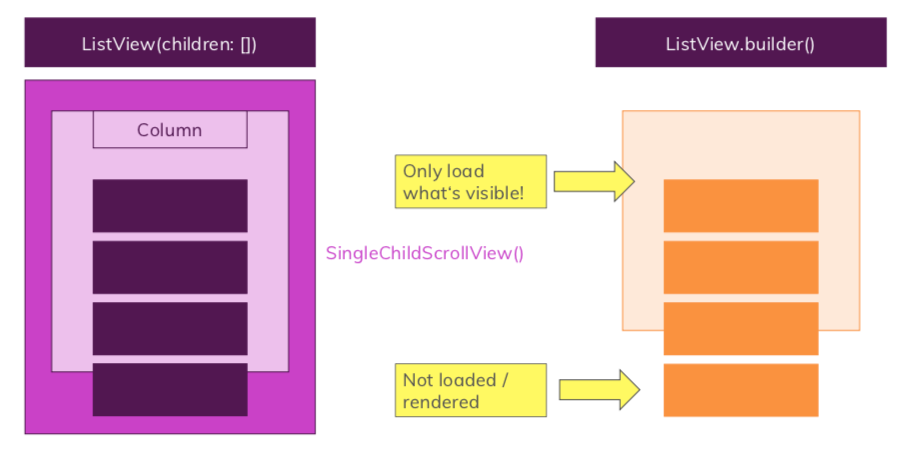
//ListView.builder is a way of constructing the list where children’s (Widgets) are built on demand. However, instead of returning a static widget, it calls a function which can be called multiple times (based on itemCount ) and it’s possible to return different widget at each call.
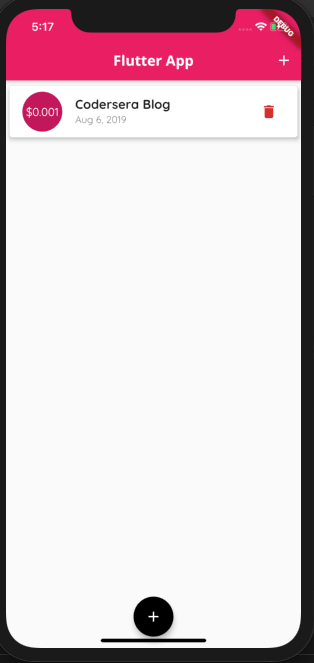
ListView.builder(
itemBuilder: (ctx, index){
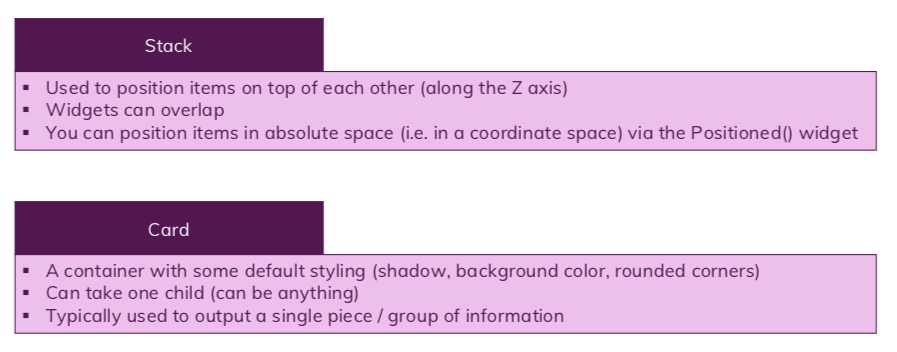
return Card(
elevation: 5,
margin: EdgeInsets.symmetric(vertical: 8, horizontal: 5),
child: ListTile(
leading: CircleAvatar(radius: 30,
child: Padding(
padding: const EdgeInsets.all(6.0),
child: FittedBox(child: Text('\$${transactions[index].amount}')),
),
),
title: Text(
transactions[index].title,
style: Theme.of(context).textTheme.title,
),
//Use of intl library, DateFormat is coming from intl
subtitle: Text(
DateFormat.yMMMd().format(transactions[index].date),
),
trailing: IconButton(
icon: Icon(Icons.delete),
color: Theme.of(context).errorColor,
onPressed: () => deleteTx(this.transactions[index].id),
),
),
);
},
itemCount: transactions.length,
)
);
}
}12. Let’s import transaction_list.dart file in main.dart file, and use it.
#file: main.dart
import 'package:flutter/material.dart';
import './widgets/transaction_list.dart';
import './models/transaction.dart';
.................
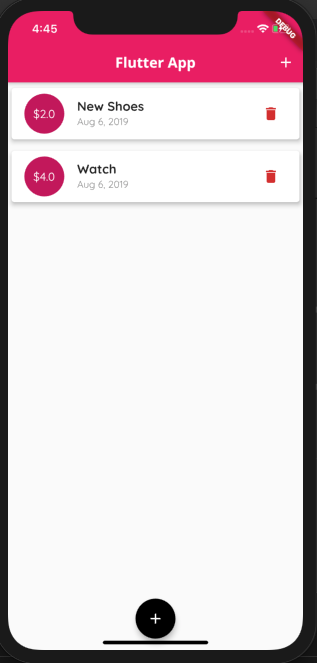
class _MyHomePageState extends State<MyHomePage> {
//Let's add demo list of transactions into a variable, it must be final
final List<Transaction> _userTransactions = [
Transaction(id: '1', title: 'New Shoes', amount: 2.00, date: DateTime.now()),
Transaction(id: '2', title: 'Watch', amount: 4.00, date: DateTime.now()),
];
//adding a function into our file which needs to pass into the constructor of the transactions_list.dart file
void _deleteTransaction(String id){
// setState helps to re-render the class/widget
setState(() {
this._userTransactions.removeWhere((tx) => id == tx.id);
});
}
@override
Widget build(BuildContext context) {
return Scaffold(
appBar: AppBar(
title: Text(
'Flutter App',
),
actions: <Widget>[
IconButton(
icon: Icon(Icons.add),
onPressed: () => {},
)
],
),
body: SingleChildScrollView(
child: Column(
crossAxisAlignment: CrossAxisAlignment.stretch,
children: <Widget>[
TransactionList(this._userTransactions, this._deleteTransaction),
],
),
),
floatingActionButtonLocation: FloatingActionButtonLocation.centerFloat,
floatingActionButton: FloatingActionButton(child: Icon(Icons.add), onPressed: () => {}),
);
}
}
13. Let’s now add new_transaction.dart file in our project so that users can add new transactions.
#file: new_transaction.dart
import 'package:flutter/material.dart';
import 'package:intl/intl.dart';
class NewTransaction extends StatefulWidget {
final addTx;
NewTransaction(this.addTx);
@override
_NewTransactionState createState() => _NewTransactionState();
}
class _NewTransactionState extends State<NewTransaction> {
final _titleController = TextEditingController();
final _amountController = TextEditingController();
DateTime _selectedDate;
void _submitData() {
if(_amountController.text.isEmpty){
return;
}
final enteredTitle = this._titleController.text;
final enteredAmount = double.parse(this._amountController.text);
//adding the validations for form
if (enteredTitle.isEmpty || enteredAmount <= 0 || _selectedDate == null) {
return;
}
//this is how we use the variables from the stateful class into its state class
widget.addTx(enteredTitle, enteredAmount, _selectedDate);
//we use pop function of Navigator to close this modal after submitting
Navigator.of(context).pop();
}
void _presentDatePicker() {
showDatePicker(
context: context,
initialDate: DateTime.now(),
firstDate: DateTime(2019),
lastDate: DateTime.now())
.then((pickedDate) {
if (pickedDate == null) {
return;
} else {
setState(() {
this._selectedDate = pickedDate;
});
}
});
}
@override
Widget build(BuildContext context) {
return Card(
child: Column(
crossAxisAlignment: CrossAxisAlignment.end,
children: <Widget>[
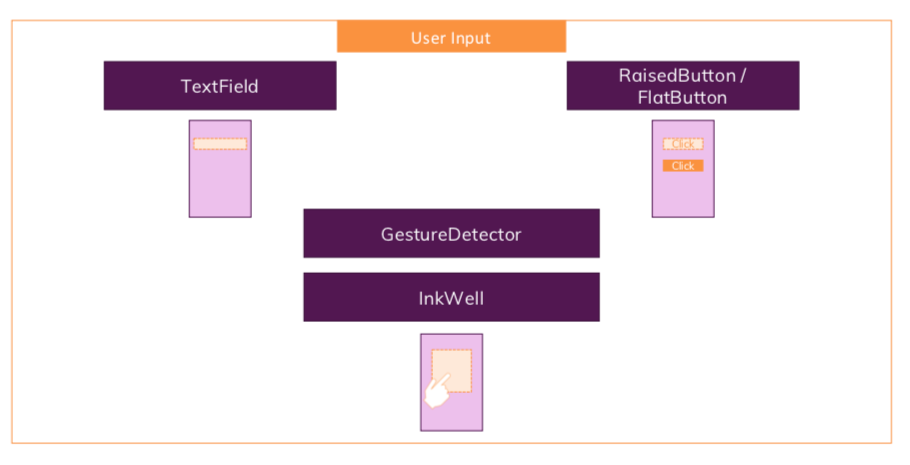
TextField(
decoration: InputDecoration(labelText: 'Title'),
controller: _titleController,
//we use _(underscore) in argument if we don't want to mess with the parameter which is coming from its call
onSubmitted: (_) => _submitData(),
),
TextField(
decoration: InputDecoration(labelText: 'Amount'),
controller: _amountController,
keyboardType: TextInputType.numberWithOptions(decimal: true),
onSubmitted: (_) => _submitData(),
),
Container(
height: 70,
child: Row(
children: <Widget>[
Expanded(
child: Text(
_selectedDate == null
? 'No date chosen!'
: 'Selected Date: ${DateFormat.yMd().format(_selectedDate)}',
),
),
FlatButton(
child: Text(
'Choose Date',
style: TextStyle(fontWeight: FontWeight.bold),
),
onPressed: _presentDatePicker,
textColor: Theme.of(context).primaryColor,
),
],
),
),
RaisedButton(
child: Text('Add Transaction'),
color: Theme.of(context).primaryColor,
textColor: Colors.white,
onPressed: _submitData,
),
],
),
);
}
}14. Now let’s import the new_transaction file in main.dart and add functionalities like adding form through modal, and add functionality.
#file: main.dart

import 'package:flutter/material.dart';

import './widgets/transaction_list.dart';
import './widgets/new_transaction.dart';
import './models/transaction.dart';

...............

class _MyHomePageState extends State<MyHomePage> {

  final List<Transaction> _userTransactions = [
//commented the dummy transactions
    //  Transaction(id: '1', title: 'New Shoes', amount: 2.00, date: DateTime.now()),
    //  Transaction(id: '2', title: 'Watch', amount: 4.00, date: DateTime.now()),
  ];

  void _addNewTransaction(String title, double amount, DateTime chosenDate){
    final newTx = Transaction(title: title, amount: amount, id: DateTime.now().toString(), date: chosenDate);

    setState(() {
      this._userTransactions.add(newTx);
    });
  }

  void _startAddNewTransaction(BuildContext ctx){
//it's been coming from material.dart
    showModalBottomSheet(
      context: ctx,
      builder: (_){
      return NewTransaction(this._addNewTransaction);
    });
  }

  void _deleteTransaction(String id){
//List has some pre-defined methods like removeWhere
    setState(() {
      this._userTransactions.removeWhere((tx) => id == tx.id);
    });
  }

  @override
  Widget build(BuildContext context) {
    return Scaffold(
      appBar: AppBar(
        title: Text(
          'Flutter App',
        ),
//Now we are calling our function to open modal, instead of doing nothing
        actions: <Widget>[
          IconButton(
            icon: Icon(Icons.add),
            onPressed: () => _startAddNewTransaction(context),
          )
        ],
      ),
      body: SingleChildScrollView(
        child: Column(
          crossAxisAlignment: CrossAxisAlignment.stretch,
          children: <Widget>[
            TransactionList(this._userTransactions, this._deleteTransaction),
          ],
        ),
      ),
      floatingActionButtonLocation: FloatingActionButtonLocation.centerFloat,

      floatingActionButton: FloatingActionButton(child: Icon(Icons.add), onPressed: () => _startAddNewTransaction(context),),
    );
  }
}
That concludes our tutorial, if you have any queries regarding this tutorial comment on our git repository.
FAQ
Q1. What makes Flutter unique?
Ans- The one feature of Flutter that makes it unique is that it uses a single codebase to create apps for multiple platforms. It simply means that mobile app developers are absolved from the complicated task of writing multiple codes for different platforms.
Q2. What is the future of Flutter?
Ans- Flutter is excellent while working with Android and iOS platforms. This one-time coding feature makes you not maintain two different files for the same result. In other words, write and compile a single code and use it to create high-performance and incredible apps for both iOS and Android in no time.