

Codersera


22 min to read
An Angular 5 Tutorial: Step 1 – Guide To Your First Angular 5 App
Let’s get started with your Angular 5 tutorial. First, let me introduce you to Angular 5. Angular 5 is a new version of the AngularJS framework. It is developed by Google. It comes with various improvements like optimized build and faster compile times. Angular 5 also comes with a complete rewrite. If you want to learn Angular 5 this Angular 5 tutorial is for you. Here we are going to build a notes app from scratch. There are two versions of frameworks:- -AngularJS(Version 1) -Angular(Version

Let’s get started with your Angular 5 tutorial. First, let me introduce you to Angular 5. Angular 5 is a new version of the AngularJS framework. It is developed by Google. It comes with various improvements like optimized build and faster compile times. Angular 5 also comes with a complete rewrite.
If you want to learn Angular 5 this Angular 5 tutorial is for you. Here we are going to build a notes app from scratch.

There are two versions of frameworks:-
-AngularJS(Version 1)
-Angular(Version 2+)
There is a huge difference between these two that AngularJS is a javascript framework but version 2 Angular is not a javascript framework.
Conflict b/w use or not to use Angular 5:-
Some developers prefer to use React and build their components without additional codes. But that may be a problem, too.
On the other hand, some developers choose Angular as it is a fully integrated framework. Angular allows you to quickly start working on your project without giving thought to which library to select and also how to deal with everyday problems. That is why here we are building our first Angular 5 App.
TypeScript
TypeScript is easy to learn if you have a good knowledge of JavaScript. Most modern editors are quite effective in helping with that. Nowadays the most preferable options are VSCode and any of the JetBrains IntelliJ family-like Webstorm and RubyMine.
It’s good to use a smarter editor than vim. As TypeScript is strongly typed, it will give you an extra hands-up on any mistakes in the code. One more thing is that Angular CLI with its Webpack takes care of compiling TypeScript to JavaScript. So you shouldn’t let the IDE compile it for you.
Angular CLI
Angular has its own CLI (command line interface), which will do most of the routines for you. You have to install it first to start using Angular. It requires Node 6.9.0 or higher as well as NPM 3 or Higher. You need to install both to find up-to-date documentation for installation. Once they are both install, you can install Angular CLI by running the following.
npm install -g @angular/cli
Once you successfully install Angular CLI, you can generate a new project by running the ng new command.
ng new getting-started-ng5
create getting-started-ng5/README.md (1033 bytes)
create getting-started-ng5/.angular-cli.json (1254 bytes)
create getting-started-ng5/.editorconfig (245 bytes)
create getting-started-ng5/.gitignore (516 bytes)
create getting-started-ng5/src/assets/.gitkeep (0 bytes)
create getting-started-ng5/src/environments/environment.prod.ts (51 bytes)
create getting-started-ng5/src/environments/environment.ts (387 bytes)
create getting-started-ng5/src/favicon.ico (5430 bytes)
create getting-started-ng5/src/index.html (304 bytes)
create getting-started-ng5/src/main.ts (370 bytes)
create getting-started-ng5/src/polyfills.ts (2405 bytes)
create getting-started-ng5/src/styles.css (80 bytes)
create getting-started-ng5/src/test.ts (1085 bytes)
create getting-started-ng5/src/tsconfig.app.json (211 bytes)
create getting-started-ng5/src/tsconfig.spec.json (304 bytes)
create getting-started-ng5/src/typings.d.ts (104 bytes)
create getting-started-ng5/e2e/app.e2e-spec.ts (301 bytes)
create getting-started-ng5/e2e/app.po.ts (208 bytes)
create getting-started-ng5/e2e/tsconfig.e2e.json (235 bytes)
create getting-started-ng5/karma.conf.js (923 bytes)
create getting-started-ng5/package.json (1324 bytes)
create getting-started-ng5/protractor.conf.js (722 bytes)
create getting-started-ng5/tsconfig.json (363 bytes)
create getting-started-ng5/tslint.json (3040 bytes)
create getting-started-ng5/src/app/app.module.ts (316 bytes)
create getting-started-ng5/src/app/app.component.css (0 bytes)
create getting-started-ng5/src/app/app.component.html (1141 bytes)
create getting-started-ng5/src/app/app.component.spec.ts (986 bytes)
create getting-started-ng5/src/app/app.component.ts (207 bytes)
Installing packages for tooling via yarn.
yarn install v1.3.2
info No lockfile found.
[1/4] ? Resolving packages...
[2/4] ? Fetching packages...
[3/4] ? Linking dependencies...
warning "@angular/cli > @schematics/angular@0.1.10" has incorrect peer dependency "@angular-devkit/schematics@0.0.40".
warning "@angular/cli > @angular-devkit/schematics > @schematics/schematics@0.0.10" has incorrect peer dependency "@angular-devkit/schematics@0.0.40".
[4/4] ? Building fresh packages...
success Saved lockfile.
✨ Done in 44.12s.
Installed packages for tooling via yarn.
Successfully initialized git.
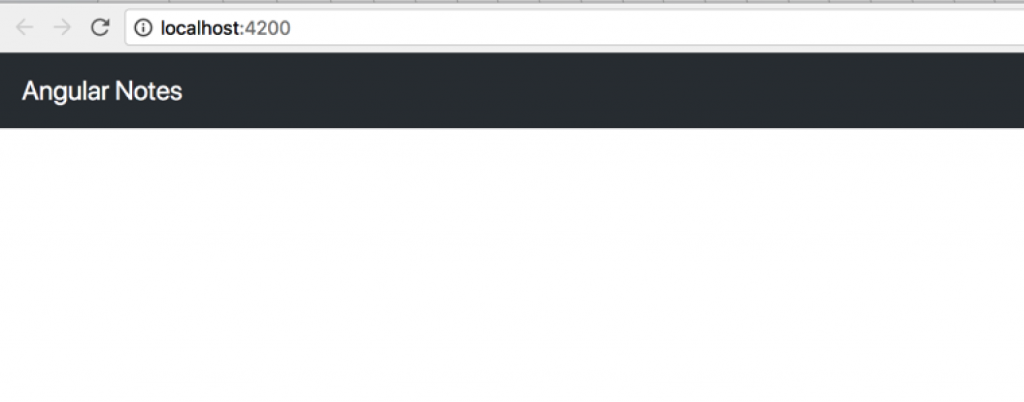
Project 'getting-started-ng5' successfully created.When it’s done, you can ask for your fresh application to start by running ng serve out of its directory:
ng serve
** NG Live Development Server is listening on localhost:4200, open your browser on http://localhost:4200/ **
Date: 2017-12-13T17:48:30.322Z
Hash: d147075480d038711dea
Time: 7425ms
chunk {inline} inline.bundle.js (inline) 5.79 kB [entry] [rendered]
chunk {main} main.bundle.js (main) 20.8 kB [initial] [rendered]
chunk {polyfills} polyfills.bundle.js (polyfills) 554 kB [initial] [rendered]
chunk {styles} styles.bundle.js (styles) 34.1 kB [initial] [rendered]
chunk {vendor} vendor.bundle.js (vendor) 7.14 MB [initial] [rendered]
webpack: Compiled successfully.
When you navigate your browser to that link, It will be displayed as pictured here:
Let’s get started with the Angular 5 Tutorial
Now let’s see what is happening here. Angular CLI runs webpack dev server, which renders your app on the next free port because of this you can run multiple apps on the same machine with a life reload. It also watches for every change in the project source and recompiles all changes. After that, it asks the browser to reload the open page. So we are already working in a development environment without writing a line of configuration by using Angular CLI. But it’s just a start here…
App composition in angular
You have your empty app running. Now let’s talk about app composition in Angular. If you have basic knowledge of AngularJS you know there were controllers, directives, and components that were somehow like directives but simpler, to allow you to upgrade to Angular 2.
Those who don’t have that wonderful experience of having to choose between them and also figure out what goes where. But you do not need to worry. Nowadays it’s mostly just a component. In the Angular world component is the most basic building block.
Let’s look at the code that was generated for you by Angular CLI.
First, here’s index.html :
<!doctype html>
<html lang="en">
  <head>
    <meta charset="utf-8">
    <title>GettingStartedNg5</title>
    <base href="/">
    <meta name="viewport" content="width=device-width, initial-scale=1">
    <link rel="icon" type="image/x-icon" href="favicon.ico">
  </head>
  <body>
    <app-root></app-root>
  </body>
</html>
It looks like the kind of markup. But there’s a special tag, app-root. How does Angular make this work, and how can we know what’s happening inside it?
Let’s open the src/app directory and see what’s there. You can see ng new output from earlier here or open it in your chosen IDE. You will see app.component.ts there were the next bit( this may vary depending on how recent your version of Angular is):
import {
	Component
} from '@angular/core';
@Component({
	selector: 'app-root',
	templateUrl: './app.component.html',
	styleUrls: ['./app.component.css']
})
export class AppComponent {
	title = 'app';
}
@components(—) here looks like a function call. What is it? there is a TypeScript decorator we will discuss later. For now let’s concentrate on what it’s doing, with passed parameters like selector being used to generate your component declaration. It just goes a lot of boilerplate work for you as well as giving back your component declaration in its working form. You don’t have to implement additional code to support any of the decorator’s parameters. It’s all handled by the decorator. Generally, it is called the Factory method.
You already saw app-root in your index.html. Here’s how Angular knows how to find the component corresponding to your tag. TemplateUrl and styleUrls define where Angular should take your markup and CSS from. there are a lot more parameters for the component decorator. We are also going to use some of them in our new app.
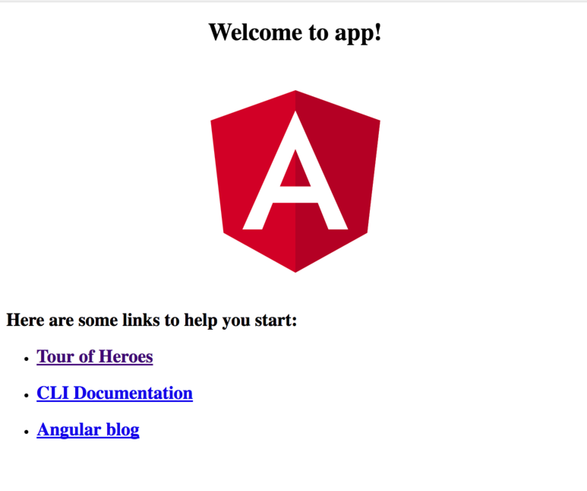
Let’s look at the component’s markup:
<!--The content below is only a placeholder and can be replaced.-->
<div style="text-align:center">
  <h1> Welcome to {{ title }}! </h1>
  <img width="300" alt="Angular Logo" src="data:image/svg+xml;base64,PHN2ZyB4bWxucz0iaHR0cDovL3d3dy53My5vcmcvMjAwMC9zdmciIHZpZXdCb3g9IjAgMCAyNTAgMjUwIj4KICAgIDxwYXRoIGZpbGw9IiNERDAwMzEiIGQ9Ik0xMjUgMzBMMzEuOSA2My4ybDE0LjIgMTIzLjFMMTI1IDIzMGw3OC45LTQzLjcgMTQuMi0xMjMuMXoiIC8+CiAgICA8cGF0aCBmaWxsPSIjQzMwMDJGIiBkPSJNMTI1IDMwdjIyLjItLjFWMjMwbDc4LjktNDMuNyAxNC4yLTEyMy4xTDEyNSAzMHoiIC8+CiAgICA8cGF0aCAgZmlsbD0iI0ZGRkZGRiIgZD0iTTEyNSA1Mi4xTDY2LjggMTgyLjZoMjEuN2wxMS43LTI5LjJoNDkuNGwxMS43IDI5LjJIMTgzTDEyNSA1Mi4xem0xNyA4My4zaC0zNGwxNy00MC45IDE3IDQwLjl6IiAvPgogIDwvc3ZnPg==">
</div>
<h2>Here are some links to help you start: </h2>
<ul>
  <li>
    <h2>
      <a target="_blank" rel="noopener" href="https://angular.io/tutorial">Tour of Heroes</a>
    </h2>
  </li>
  <li>
    <h2>
      <a target="_blank" rel="noopener" href="https://github.com/angular/angular-cli/wiki">CLI Documentation</a>
    </h2>
  </li>
  <li>
    <h2>
      <a target="_blank" rel="noopener" href="https://blog.angular.io/">Angular blog</a>
    </h2>
  </li>
</ul>
So, aside from embedding the Angular Logo as an SVG, which is pretty neat, this seems like typical everyday markup as well. Aside from one thing ( Welcome to {{ title }} !), If you look at your component code again, you will see title=’app’;. So, if you already have some practice in template languages or have worked with AngularJS, it’s pretty obvious what’s happening here. It is called Angular Interpolation by which the expression inside the double curly braces is being pulled from your component( you can think of {{ title }} as a simplified form of {{ this. title }} ) and also displayed on your markup.
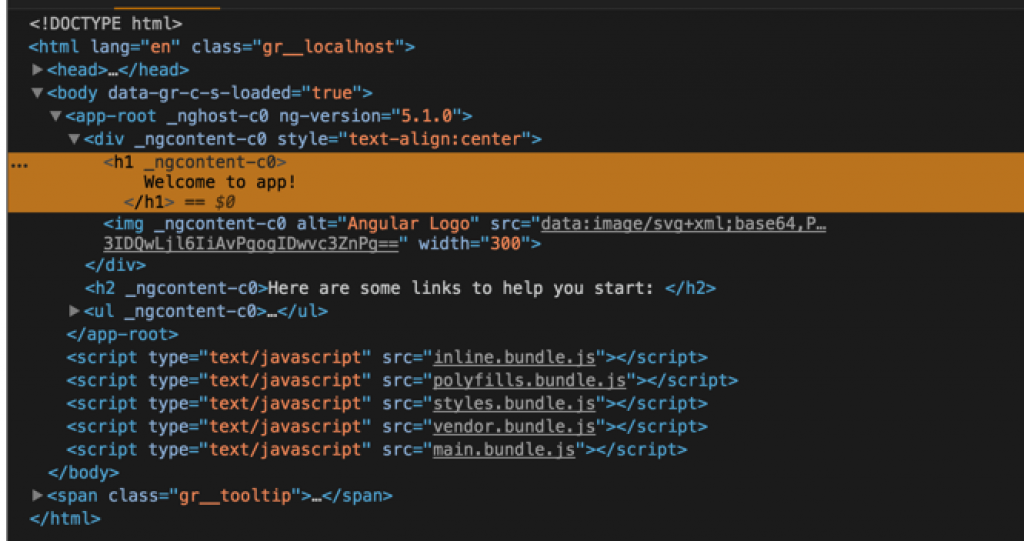
Now you have seen all the parts of your auto-generated Angular app that take place in the page displayed in your browser. Let’s recap how it works- Angular CLI runs Webpack, which is compiling your Angular app into Javascript bundles and injecting them into your index.html. If you take a look at the actual code in your browser using the inspect feature, you see something like this:
Every time you change your code, Angular CLI will recompile, re-inject if needed, and also ask your browser to reload the page if it’s open. Angular does it quite quickly, so in most cases, while you are switching your windows from the IDE to the browser, it will all be reloaded for you.
So let’s start moving towards your goal and, for a start, let’s switch your project from CSS to Sass and open your .angular-CLI.json and edit styles and styleExt properties thusly.
"styles": [
  "styles.scss"
],
[...]
"defaults": {
  "styleext": "scss",
  "component": {
  }
}
You also need to add the Sass library to our project and rename styles.css to styles. CSS. So to add Sass you need to use yarn :
`yarn add sas
yarn add v1.3.2
[1/4] ? Resolving packages...
[2/4] ? Fetching packages...
[3/4] ? Linking dependencies...
[...]
[4/4] ? Building fresh packages...
success Saved lockfile.
success Saved 1 new dependency.
└─ sass@1.0.0-beta.4
✨ Done in 12.06s.
yarn add node-sass@4.7.2 --dev
✨ Done in 5.78s.
If you also want to use Twitter Bootstrap on your project so you also need to run yarn add bootstrap@v4.0.0-beta.2 and edit your styles. scss to include this:
/* You can add global styles to this file, and also import other style files */
@import "../node_modules/bootstrap/scss/bootstrap";
body {
  padding-top: 5rem;
}
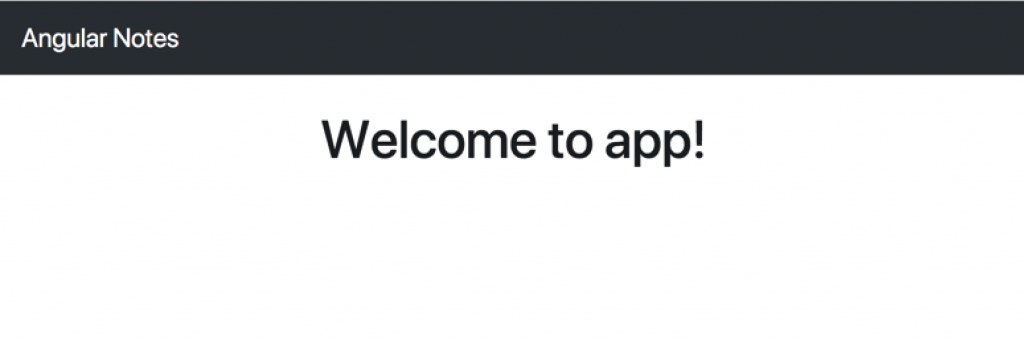
you need to edit index.html to make your page responsive by changing the meta for your markup to this:
<meta name="viewport" content="width=device-width, initial-scale=1.0, user-scalable=no">And now you can replace app.componant.html with this:
<!-- Fixed navbar -->
<nav>
  <a href="#">Angular Notes</a>
</nav>
<div>
  <div style="text-align:center">
    <h1> Welcome to {{title}}! </h1>
  </div>
</div>
now, if you open your browser, you see the following:
And that’s it for the boilerplate. Let’s move on to creating your components.
First Components
Let’s start by generating your first component, representing the card itself. For that, use Angular CLI by running the following command:
ng generate component Card
  create src/app/card/card.component.scss (0 bytes)
  create src/app/card/card.component.html (23 bytes)
  create src/app/card/card.component.spec.ts (614 bytes)
  create src/app/card/card.component.ts (262 bytes)
  update src/app/app.module.ts (390 bytes)
But if you look into src/app/card/card.component.ts, you can see they are almost the same code, as you have in your AppComponent, with one small difference:
[...]
@Component({
			selector: 'app-card',
			[...]
			export class CardComponent implements OnInit {
				constructor() {}
				ngOnInit() {}
			}
At this point, it’s considered good practice to preface your component selectors with a common prefix, and by default, it’s an app- You can change it to the prefix of your preference by editing the prefix property in .angular-CLI.json, so it’s preferable to do so before using ng generate for the first time.
So, you have a constructor for your component as well as a ngOnInit function for it. On a basic level, think about these methods like this: A constructor is being called right after the creation of the component, long before data to be passed to it is ready and populated, while ngOnInit only runs after the first cycle of changes to the data, so you have access to your component inputs. Just remember that it is preferable to use the constructor for constants, like things that are being hard-coded into your component, as well as ngOnInit for everything that depends on external data.
Let’s populate your CardComponent implementation. To start with, let’s just add some markup to it. Default contents for markup are something like this:
<p>
  card works!
</p>
Replace it with code so it will behave like a card:
<div>
  <div>
    <p>Text</p>
  </div>
</div>
Now is a good time to display the card component, but this raises additional questions: Who will be responsible for displaying the cards? AppComponent? But AppComponent will be loaded before anything else in the app, so you have to consider it to be tidy and small. you’d better create one more component to take care of storing a list of cards and displaying it on your page.
As described component’s responsibilities, it is clear that this is supposed to be a Card List Component. Let’s ask Angular CLI to generate it for you:
ng generate component CardList
  create src/app/card-list/card-list.component.scss (0 bytes)
  create src/app/card-list/card-list.component.html (28 bytes)
  create src/app/card-list/card-list.component.spec.ts (643 bytes)
  create src/app/card-list/card-list.component.ts (281 bytes)
  update src/app/app.module.ts (483 bytes)
Before we start implementing it, Angular CLI tells you that it updated app.module.ts for you, correct it:
import {
	BrowserModule
} from '@angular/platform-browser';
import {
	NgModule
} from '@angular/core';
import {
	AppComponent
} from './app.component';
import {
	CardComponent
} from './card/card.component';
import {
	CardListComponent
} from './card-list/card-list.component';
@NgModule({
	declarations: [
		AppComponent,
		CardComponent,
		CardListComponent,
	],
	imports: [
		BrowserModule
	],
	providers: [],
	bootstrap: [AppComponent]
})
export class AppModule {}
BrowserModule and NgModule are internal Angular modules. AppComponent was here before you started to generate any code, so your new components populated the modules in two places. First, they are imported from their definition files, and then they are included in the declaration array of your NgModule Decorator. If you are creating a new component from scratch and forget to add a new module to NgModule but try to add it to your markup, your app won’t work with the next error in the JS console.
Uncaught Error: Template parse errors:
'app-card-list' is not a known element:
1. If 'app-card-list' is an Angular component, then verify that it is part of this module.
2. If 'app-card-list' is a Web Component then add 'CUSTOM_ELEMENTS_SCHEMA' to the '@NgModule.schemas' of this component to suppress this message. ("
So check your console if your app is not working for no apparent reason.
Let’s populate your card list component markup ( src/app/card-list/card-list.component.html )
<div>
<div>
<app-card></app-card>
<app-card></app-card>
<app-card></app-card>
</div>
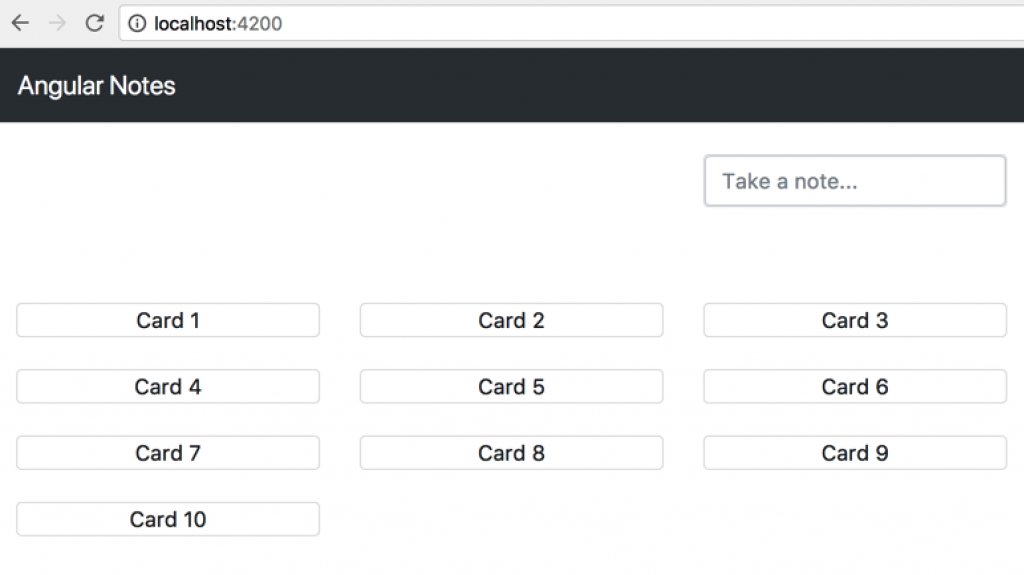
</div>If you open it in your browser, you will see something like this :
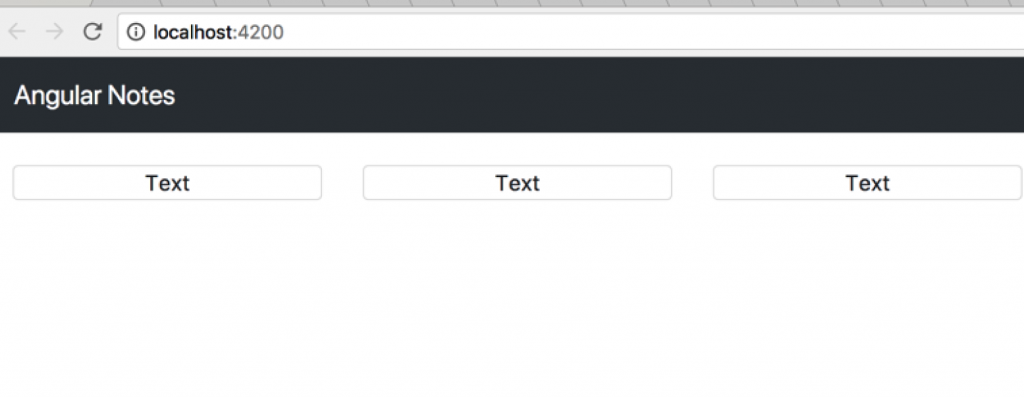
Currently displaying cards out of the hard-coded markup. Let’s bring your code one step closer to a real-case scenario by moving a hard-coded array of cards into your application:
export class AppComponent {
  public cards: Array<any> = [
    {text: 'Card 1'},
    {text: 'Card 2'},
    {text: 'Card 3'},
    {text: 'Card 4'},
    {text: 'Card 5'},
    {text: 'Card 6'},
    {text: 'Card 7'},
    {text: 'Card 8'},
    {text: 'Card 9'},
    {text: 'Card 10'},
  ];
}
You have your initial list, but still, you need to pass it to the component and render it there. for that, you need to create your first input. Let’s add it to your CardList component:
import {
	Component,
	Input,
	OnInit
} from '@angular/core';
[...]
export class CardListComponent implements OnInit {
	@Input() cards: Array < any > ;
	[...]
Imported Input from the Angular code and used it as a decorator for class-level variables cards with type Arrays of objects of any kind. Ideally, you should not use any but should use strict typing so that you can define something like an interface card, which will contain all the properties of your card.
Now you have your card array in your CardList. Let’s take a look at the new code in your card list component.
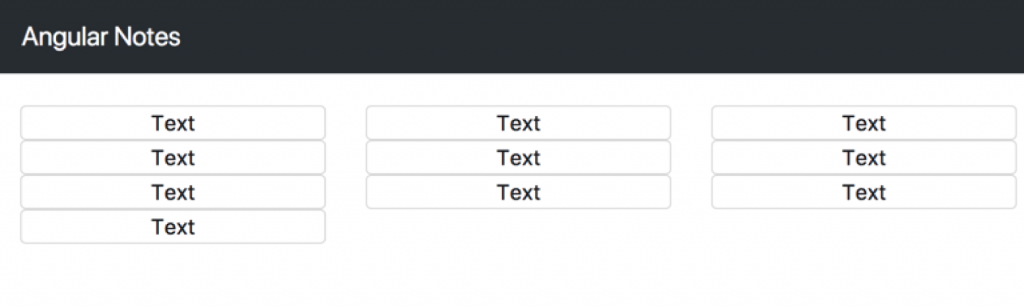
<app-card *ngFor="let card of cards">
An attribute name that starts from an asterisk. What does it mean? It’s a default convention for naming Angular structural directives. Structure directives control the structure of your template. The asterisks here are actually “syntax sugar,“. But for your current example, it's enough to understand what will happen when you add it to your component. So ngFor a repeater directive and it will repeat your app card for every element in the array of cards. If you look at the browser, you see this next:
Something is not right; you have your array of cards, but you are getting an empty page.
You define your array of cards on the AppComponent level, But you haven’t passed it to CardList input. Let’s edit your AppComponent template to do that.
<app-card-list [cards]="cards">
This syntax – The attributes in the square brackets – tells angular that you would like to one-way bind your component variable cards to your Card List component [cards] input. As soon as you do that, you get this:
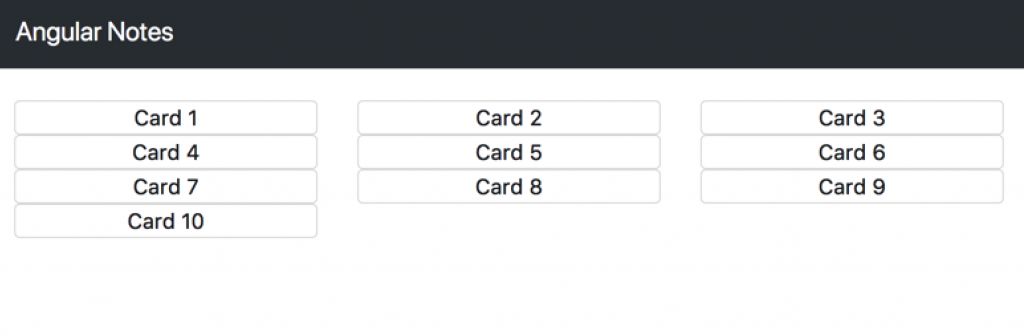
Of course, you want to display the actual contents of your card array, and for that, you need to pass the card object to the card component as well. Let’s extend your Card List component:
<app-card *ngFor="let card of cards" [card]="card">
And if you look in the browser right now, you’ll get the next error in the JS console: Can’t bind to ‘card’ since it isn’t a known property of ‘app-card’ .. Angular is telling us that you still need to define your input in the Card component. So you can edit thusly:
import {
	Component,
	Input,
	OnInit
} from '@angular/core';
[...]
export class CardComponent implements OnInit {
	@Input() card: any;
	[...]
And let’s add your card text property to the Card component template:
[...]
<p>{{ card.text }}</p>
[...]
Let’s see how it works now:
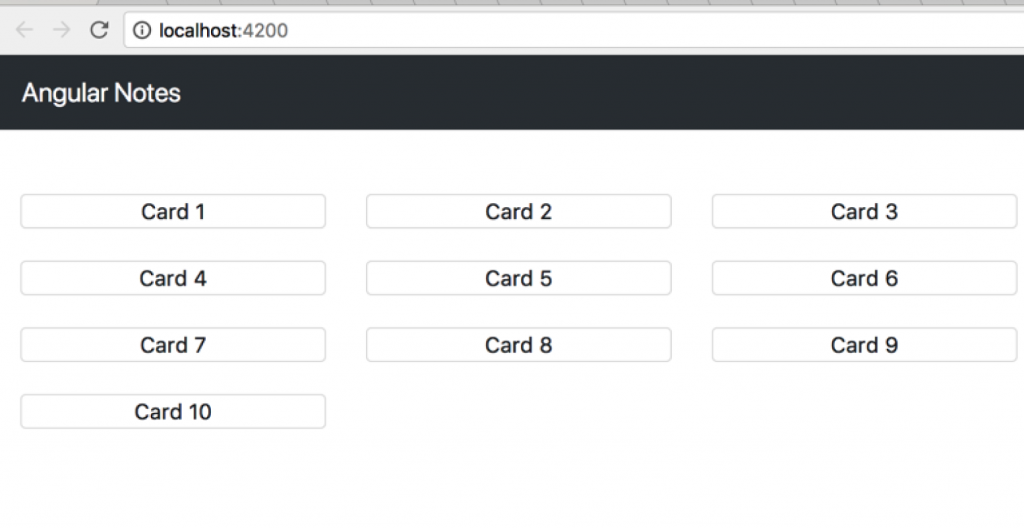
Looks fine, but the styling is a little off. Let’s fix that by adding a new style to card.component.css :
.card {
    margin-top: 1.5rem;
}
And now it looks better:
Component Communication
Let’s add a New Card Input component that will allow you to add notes:
ng g component NewCardInput
  create src/app/new-card-input/new-card-input.component.scss (0 bytes)
  create src/app/new-card-input/new-card-input.component.html (33 bytes)
  create src/app/new-card-input/new-card-input.component.spec.ts (672 bytes)
  create src/app/new-card-input/new-card-input.component.ts (300 bytes)
  update src/app/app.module.ts (593 bytes)
And add this next to its template:
<div>
  <div>
    <input placeholder="Take a note...">
  </div>
</div>
Next, add this to the component decorator:
[...]
@Component({
  selector: 'app-new-card-input',
[...]
  host: {'class': 'col-4'}
})
[...]
And add your new component to the AppComponent template:
[...] <div>
  <div>
    <app-new-card-input></app-new-card-input>
  </div>
</div>
<app-card-list [cards]="cards"></app-card-list>
Let’s take a look at the browser.
The problem is that your new component is not doing anything. Let’s make it work – by adding a variable that will hold your new card:
[...]
export class NewCardInputComponent implements OnInit {
[...]
public newCard: any = {text: ''};
[...]
How do you populate it with your input? If you have worked with AngularJS before, you may know the concept of two-way data binding. Or, you might have seen it in all those fancy AngularJS demos, where you input value to input and it updates the page content for you.
Here’s an interesting tidbit: Two-way data binding is no longer with you in Angular. But that doesn’t mean you have lost access to the behavior. You already saw and used [value]=” expression”, which binds the expression to the input element’s value property. But you also have (input)=” expression”, a declarative way of binding an expression to the input elements' input event. Together they can be used thusly:
<input [value]="newCard.text" (input)="newCard.text = $event.target.value">
So, every time your new card.text value changes, it’ll be passed to your component input. And every time the user inputs data into your input and the browser outputs input $event, you assign your new card.text to the input value.
One more thing before you implement it: This input looks like a little much, doesn’t it? Angular gives us a little syntax sugar for it, which you can use here, so started from a different angle to explain how this sugar works.
<input placeholder="Take a note..." [(ngModel)]="newCard.text">
This syntax,( [ ] ), called banana in a box or ngModel, is the Angular directive that takes care of getting value out of events and all that. So you can just write a simpler code that takes your value and binds it to both the value of the input and your variable in the code.
Unfortunately, after you added ngModel, you are getting the error, Can’t bind to ‘ngModel’ since it isn’t a known property of ‘input’. You need to import the model to your AppModule. But from where? If check the documentation, you can see that it’s in the Angular Forms module. So you need to AppModule thusly:
[...]
import {FormsModule} from "@angular/forms";
@NgModule({
[...]
  imports: [
    BrowserModule,
    FormsModule
  ],
[...]
Working with native events
So you have your variable populated, but you still, need to send that value to the card list in AppComponent. For communicating data to the component Angular, you must have input. It seems that to communicate data outside the component, you have output, and you use it, in the same way, you would use input— import it from the Angular code and use a decorator to define it:
import {Component, EventEmitter, OnInit, Output} from '@angular/core';
[...]
export class NewCardInputComponent implements OnInit {
[...]
@Output() onCardAdd = new EventEmitter<string>();
[...]
}
But there is more than just output; you also define something called EventEmitter because the component output is supposed to be an event, but you shouldn’t think about it the same way you did those old JavaScript events. They aren’t bubbles. You don’t need to call preventDefault in every event listener. To send data from the component, you should use its payload. So you need to subscribe to the events—how do you do that? Let’s change the AppComponent template:
<app-new-card-input (onCardAdd)="addCard($event)">
You are also binding an expression to the event onCardAdd, just as you mentioned in our NewCardInput component. Now you need to implement the addCard method on your AppComponent.
[...]
export class AppComponent {
[...]
addCard(cardText: string) {
  this.cards.push({text: cardText});
}
But you’re still not outputting it from anywhere. Let’s try to make it happen when the user hits the enter key. You need to listen for the DOM keypress event in your component as well as output the Angular event triggered by that. For listening to DOM events, Angular gives you the HostListener decorator. It’s a function decorator that takes the name of a native event you want to listen for as well as the function Angular wants to call in response to it. Let’s implement it and discuss how it works:
import {Component, EventEmitter, OnInit, Output, HostListener} from '@angular/core';
[...]
export class NewCardInputComponent implements OnInit {
[...]
@HostListener('document:keypress', ['$event'])
handleKeyboardEvent(event: KeyboardEvent) {
  if (event.code === "Enter" && this.newCard.text.length > 0) {
    this.addCard(this.newCard.text);
   }
}
[...]
addCard(text) {
  this.onCardAdd.emit(text);
  this.newCard.text = '';
}
[...]
So, if the document: keypress event happens, you check that the key pressed was Enter and your new card. the text has something in it. After that, you can call your addCard method, in which you output Angular onCardAdd with text from your card and reset the card text to an empty string so the user can continue to add new cards without editing the old card’s text.
Working with Forms
There are a couple of approaches to working with forms in Angular—one is template-driven and you are already using the most valuable part of it: ngModel for two-way binding. But forms in Angular are not only about model values but also about validity. Currently, you check for the validity of NewCardInput in your HostListener function. Let’s move it to a more template-driven form. For that, you can change the template for your component:
<form novalidate #form="ngForm">
  <input placeholder="Take a note..." name="text" [(ngModel)]="newCard.text" required>
</form>
Here’s another syntax sugar from Angular. The hash #form is a template reference variable that you can use to access your form out of your code. Let’s use it to make sure you use the required attribute validation instead of the manual check on value length:
import {Component, EventEmitter, OnInit, Output, HostListener, ViewChild} from '@angular/core';
import {NgForm} from '@angular/forms';
[...]
export class NewCardInputComponent implements OnInit {
[...]
@ViewChild('form') public form: NgForm;
[...]
  @HostListener('document:keypress', ['$event'])
  handleKeyboardEvent(event: KeyboardEvent) {
    if (event.code === "Enter" && this.form.valid) {
[...]
One more new decorator is here: ViewChild. Using that, you can access any element marked by template reference value—in this case, your form, as well as you actually, declare it as your Component public variable form, so you can write this.form.valid.
Working with template-driven forms is absolutely the same as you did before with simple HTML forms. But if you need something more complex, there is a different kind of form for that case in Angular: reactive. You’ll cover what they react to after converting your form. For that, let’s add a new import to AppModule.
[...]
import {FormsModule, ReactiveFormsModule} from "@angular/forms";
[...]
imports: [
[...]
ReactiveFormsModule,
]
[...]
Reactive forms are defined in code instead of template-driven forms, so let’s change the NewCardInput component code:
[...]
import {
	FormBuilder,
	FormGroup,
	Validators
} from '@angular/forms';
[...]
export class NewCardInputComponent implements OnInit {
	[...]
	newCardForm: FormGroup;
	constructor(fb: FormBuilder) {
			this.newCardForm = fb.group({
				'text': ['', Validators.compose([Validators.required, Validators.minLength(2)])],
			});
		}
		[...]
	if (event.code === "Enter" && this.form.valid) {
		this.addCard(this.newCardForm.controls['text'].value);
		[...]
		addCard(text) {
			this.onCardAdd.emit(text);
			this.newCardForm.controls['text'].setValue('');
		}
In addition to importing new modules, some new things are happening here. First of all, you are using dependency injection for FormBuilder on your constructor and also building your form with it. In the text there is a name of your field, an empty string is an initial value, and Validators. compose allows you to combine multiple validators on a single field. You use
.value and .setValue(”) to access the value for your field.
Let’s look at your markup for this new way of working with forms:
<form [formGroup]="newCardForm" novalidate>
  <input placeholder="Take a note..." name="text" formControlName="text">
</form>
You are using FormGroupDirective to tell Angular what form group Angular needs to look into for its definition. By using the form control name, you are telling Angular what field in the reactive form you should use.
For now, the main difference between the previous approach with template-driven forms and the new approach with reactive forms is in more coding on the reactive side. Is it worth it, if you don’t need to define the form dynamically?
It is. To understand how it may be helpful, let’s discuss why this approach is called “reactive” in the first place.
Let’s start by adding additional code to your NewCardInput component constructor:
import {
takeWhile,
debounceTime,
filter
} from 'rxjs/operators';
[...]
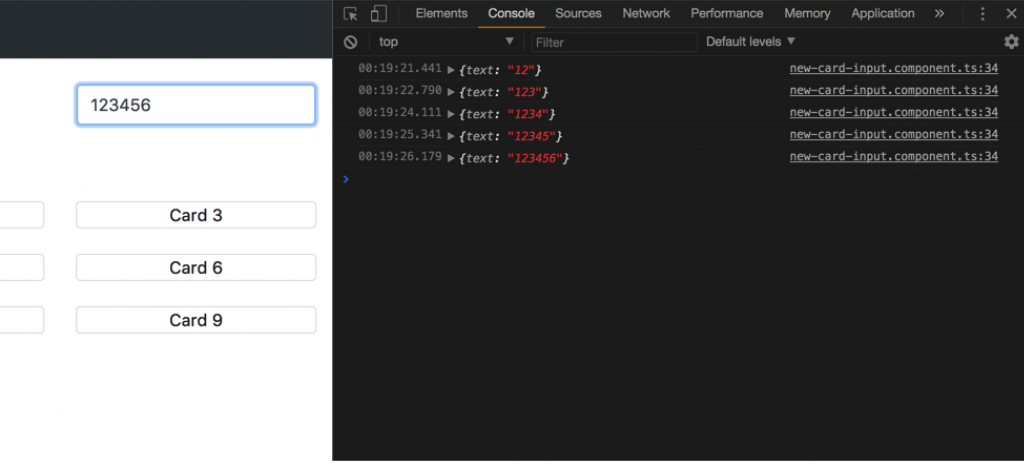
this.newCardForm.valueChanges.pipe(
filter((value) => this.newCardForm.valid),
debounceTime(500),
takeWhile(() => this.alive)
).subscribe(data => {
console.log(data);
});
Open the browser and developer tools console, and watch what will happen when you input a new value into your input
RxJS
So what’s happening here? You are seeing RxJS in action. Let’s discuss it. I guess you all know at least something about promises as well as building asynchronous code. Promise handling a single event. You ask the browser to make POST, for example, and it returns you a promise. RxJS operates with Observables, which handle streams of events.
Think about that like this: You have just implemented code that is called on every change of your form. If you process user changes with promises, only the first user change will be processed before you need to re-subscribe. The Observable, at the same time, can process every event in a virtually endless stream of “promises.” You can break that by getting some error along the way or by unsubscribing from the Observable.
What is takeWhile here? You are subscribing to your Observables in your components. They are used in different parts of your app, so they may be destroyed along the way—for example, when you use components as pages in your routing. But while the promise in place of the Observable will run only a single time and will be disposed of after that, the Observable is built to last as long as the stream is updating and you don’t unsubscribe. So your subscription needs to be unsubscribed (if you are not looking for memory leaks) like this:
`cnst subscription = observable.subscribe(value => console.log(value));
[...]
subscription.unsubscribe();
But in your app, you have a lot of different subscriptions. Do you need to do all that boilerplate code? You can cheat and use the takeWhile operator. By using it you make sure that your stream will stop emitting new values as soon as this. alive becomes false and you just need to set that value in the onDestroy function of your component.
Summary
So this was your first Angular 5 App. In this article, you get to know about Angular 5, Typescript, and Angular CLI as well as how to build your app in Angular 5. With the help of this, you can learn App composition in angular, component communication, and work with native events as well as Angular forms.
It will be continued with Connecting Angular with Firebase in the next article.
If you want to develop an app with angular or any other technology and it seems difficult, there is no issue Codersera is here to help you by providing the top coder for your project:- Click here to Hire A Coder
And if you belong to the ones who are passionate about coding, Codersera can allow you to work on interesting and challenging projects. All you need to do is:- Click here to Apply As Coder.
FAQ's
What is the benefit of using Angular?
Angular turns your templates into code that's highly optimized for today's JavaScript virtual machines, giving you all the benefits of hand-written code with the productivity of a framework. Serve the first view of your application on Node.
Write one Disadvantage of Angular.Js.
AngularJS Disadvantages
- Less secure.
- No specific way.
- JavaScript-Based.
- Not supported everywhere.
- Memory leakage.
Why do we use Angular.Js?
AngularJS is a structural framework for dynamic web apps. It lets you use HTML as your template language and lets you extend HTML syntax to express your application's components clearly and succinctly.
🚀 Try Codersera Free for 7 Days
Connect with top remote developers instantly. No commitment, no risk.
Tags
Trending Blogs
Discover our most popular articles and guides

10 Best Emulators Without VT and Graphics Card: A Complete Guide for Low-End PCs
Running Android emulators on low-end PCs—especially those without Virtualization Technology (VT) or a dedicated graphics card—can be a challenge. Many popular emulators rely on hardware acceleration and virtualization to deliver smooth performance.

Android Emulator Online Browser Free
The demand for Android emulation has soared as users and developers seek flexible ways to run Android apps and games without a physical device. Online Android emulators, accessible directly through a web browser.

Free iPhone Emulators Online: A Comprehensive Guide
Discover the best free iPhone emulators that work online without downloads. Test iOS apps and games directly in your browser.
10 Best Android Emulators for PC Without Virtualization Technology (VT)
Top Android emulators optimized for gaming performance. Run mobile games smoothly on PC with these powerful emulators.

Gemma 3 vs Qwen 3: In-Depth Comparison of Two Leading Open-Source LLMs
The rapid evolution of large language models (LLMs) has brought forth a new generation of open-source AI models that are more powerful, efficient, and versatile than ever.

ApkOnline: The Android Online Emulator
ApkOnline is a cloud-based Android emulator that allows users to run Android apps and APK files directly from their web browsers, eliminating the need for physical devices or complex software installations.

Best Free Online Android Emulators
Choosing the right Android emulator can transform your experience—whether you're a gamer, developer, or just want to run your favorite mobile apps on a bigger screen.
Gemma 3 vs Qwen 3: In-Depth Comparison of Two Leading Open-Source LLMs
The rapid evolution of large language models (LLMs) has brought forth a new generation of open-source AI models that are more powerful, efficient, and versatile than ever.


